There are a few different ways to make your tool post parallel to your lathe chuck. One way is to use a dial indicator. Another way is to use a combination of an edge finder and a digital caliper.
Whichever method you choose, the goal is to get the tool post as close to parallel with the chuck as possible.
Homemade Lathe Tool Post for a 100+ years old Lathe!!
Table of Contents
- Make sure your lathe is in good working order and that the chuck is properly secured
- Place your tool post on the lathe bed and position it so that the center of the tool post is aligned with the center of the chuck
- Use a dial indicator to check for any runout in the tool post or chuck
- If there is any runout, adjust accordingly
- Once everything is lined up and there is no runout, tighten down the tool post to secure it in place
Lathe Tool Height Setting Gauge
A lathe tool height setting gauge is a valuable addition to any machinist’s toolkit. This simple device helps ensure that cutting tools are properly positioned for optimum performance and safety. Here’s a look at how this handy tool works, and why it’s so important for anyone working with lathes.
The basic idea behind a lathe tool height setting gauge is to provide a quick and easy way to measure the distance from the bed of the lathe to the tip of the cutting tool. This measurement is critical in order to produce accurate cuts and avoid damaging the workpiece or injuring the operator. Most gauges consist of a ruler or tape measure marked with common tool heights, along with an adjustable stop that can be set to match the specific tool being used.
To use the gauge, simply position it against the side of the workpiece with the stop firmly against the bed of the lathe. Then, slide the gauge until it contacts the tip of the cutting tool. The measurement between the stop and where the gauge contacts the tool can then be read off ofthe ruler or tape measure, allowing you to quickly adjustthetoolheight as needed.
While alathetoolheightsettinggauge may seem likea relatively simple device, it can savea lotof timeand frustration when setting upcuttingoperations on alathe.
Credit: www.amazon.com
How Do You Align a Tool on a Lathe Machine?
Assuming you’re referring to cutting tools:
The first thing you need to do is ensure that the lathe is properly secured and clamped down. You don’t want it moving around while you’re working on it.
Once that’s done, you need to check the toolholder to make sure it’s properly locked in place. If everything looks good so far, you can start aligning the tool.
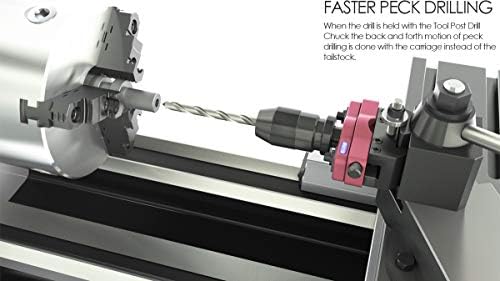
There are a few different ways to do this, but the most common is probably using an indicator.
You’ll want to set the indicator up so that it’s touching the center of the spindle nose, and then zero it out. Next, move the carriage over so that the tip of the tool is touching the indicator, and zero that out as well. Now all you have to do is adjust either the tool or the carriage until both numbers are equal.
Another method is using a test bar. This is basically just a piece of scrap metal that you clamp in place and use to check your work. To use it, just follow pretty much the same steps as with an indicator except touch the test bar with the tip of your tool instead.
Once everything is lined up properly, all that’s left to do is tighten everything down and get started cutting!
How Do You Use Parallels on a Lathe Machine?
If you’re looking to use a lathe machine with Parallels, there are a few things you’ll need to keep in mind. First, make sure that your lathe is properly set up and secured. Next, identify the workpiece you’ll be using and center it on the spindle of the lathe.
Once your workpiece is in place, you can then begin to set up your parallels.
Parallels are generally used for two main purposes on a lathe machine: turning and facing. When turning, parallels are used to create cylindrical shapes on your workpiece.
To do this, they’re placed against the side of the workpiece and rotated along with it. Facing is similar to turning, but is used to create flat surfaces on your workpiece instead of curved ones. For both operations, it’s important that the parallels are positioned correctly before starting the lathe.
Once yourparallels are in place, you can start using them for either turning or facing operations. If you’re new to using a lathe machine, it’s always best to start with small cuts and gradually increase the depth as you become more comfortable with the process. With practice, you’ll be able to produce precise and detailed results using Parallels on your lathe machine!
How Do You Align a Headstock on a Lathe?
If you’re looking to align a headstock on a lathe, there are a few things you’ll need to keep in mind. First, you’ll want to make sure that the spindle is concentric with the bore. To do this, you can use a dial indicator or a laser alignment tool.
Next, you’ll need to check the alignment of the bearings. The best way to do this is by using an optical comparator. Finally, once everything is aligned, you’ll need to tighten the set screws on the bearing caps.
How Do You Align a Lathe Tailstock?
There are many ways to align a lathe tailstock, but the most common and effective method is using a dial indicator. To align the tailstock, first identify the high spot on the spindle nose. Then, with the lathe running at slow speed, engage the live center in the tailstock and touch it lightly to the high spot on the spindle nose.
Using a pencil, make a mark on both the live center and tailstock where they meet. Now move the live center away from the spindle nose and rotate it until it is lined up with your pencil mark on the tailstock. Once you have done this, tighten down the Tail Stock Clamping Lever so that your live center will not move.
Now you can begin moving your dial indicator around in order to find out how far off your current alignment is. You want your reading to be as close to zero as possible. To do this, loosen up your Gib Screws (these are located on either side of your Tail Stock) until there is some play in your tail stock quill.
Then use your handwheel to slowly move yourtail stock back and forth until you get a reading as close to zero as possible on your dial indicator. If you need to make major adjustments, it is best tomovethetail stock allthewaytoone extremeand thenmakeyour waybacktotheotherextremebeforefine tuningwiththegib screwsagain.
After following these steps carefully, you should now have a well aligned lathe tailstock!
Conclusion
It’s common for machinists to want their tool post paralleled with their lathe chuck. There are a few different ways that this can be accomplished, but the most accurate way is to use an indicator. First, you’ll need to remove the compound rest from the lathe.
Next, you’ll need to find a spot on the tool post that is level with the top of the lathe chuck. Once you’ve found this spot, you’ll need to place your indicator on the tool post and zero it out. Then, you’ll need to rotate the lathe spindle until the indicator reads zero again.
At this point, your tool post should be parallel with your lathe chuck.