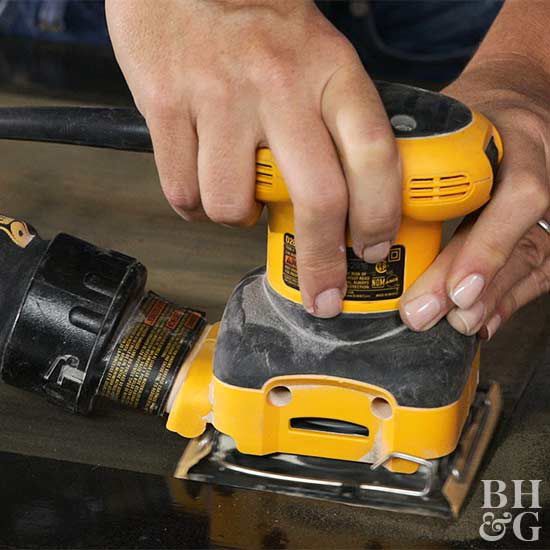
A palm sander is a power tool that uses an abrasive pad to smooth surfaces. The pads are attached to a rectangular base with a handle. Palm sanders are handheld and can be used on many different types of materials, including wood, metal, and plastic.
To use a palm sander, start by attaching the correct type of abrasive pad to the sander. Then, turn on the sander and hold it against the surface you want to sand. Apply light pressure as you move the sander back and forth across the surface until it is smooth.
- Attach a piece of sandpaper to the palm sander
- Turn on the palm sander and hold it against the surface you want to sand
- Move the palm sander back and forth across the surface until it is smooth
- Turn off the palm sander and remove the sandpaper when you are finished
How to Use a Palm Sander
Table of Contents
How Do You Use a Manual Palm Sander?
A manual palm sander is a handheld power tool that is used to smooth surfaces by abrading them with sandpaper. The motion of the tool is similar to that of a hand-held orbital sander, but the Palm sander is smaller and easier to control.
To use a manual palm sander, you will need:
-Sandpaper of various grits (coarse for rough surfaces and fine for finishing)
-A dust mask (to avoid breathing in dust particles)
-Safety glasses (to protect your eyes from flying debris)
-Hearing protection (optional, but recommended if the Palm sander will be used for extended periods of time)
Here are the steps for using a manual palm sander:
1. Choose the appropriate grit of sandpaper for the surface you will be working on.
If you are unsure, start with a coarse grit and work your way up to a finer one.
2. Place the sandpaper on the Palm sander pad. Make sure that it is firmly attached and not likely to come off during use.
3. Turn on the Palm sancer and hold it against the surface you want to sand. Apply light pressure as you move it back and forth in small, even strokes.
4. Periodically check your progress and change out the sandpaper when it starts to wear down or clog up with debris.
Assuming you’re talking about an electric palm sander:
Palm Sanders are ideal tools for quickly removing paint, varnish or other finishes from woodwork without damaging or marring underlying surfaces such as plasterboard walls or ceiling joints compound behind wallpaper etc.. They can also be used equally effectively for preparing wood surfaces prior to refinishing or painting by lightly smoothing away imperfections such as brush marks raised grain irregularities etc..
Always follow up any work done with a palm sander using progressively finer grades of abrasive paper until finally rubbing down with very fine wet & dry paper before applying any new finish.. Actual usage couldn’t be much simpler; just position abrasive paper onto backing pad making sure it’s properly secured then switch on & position unit onto area requiring attention moving it steadily backwards & forwards across surface following manufacturer’s recommendations regarding operating speeds feed rates & pressure applied while at all times keeping unit moving otherwise damage could result through localized overheating..
How Do You Use a Sander for Beginners?
Assuming you would like a blog post discussing how to use a sander for beginners:
When it comes to woodworking, one of the most important pieces of equipment is the sander. A good sander can make all the difference in your project, whether you’re working on furniture or cabinets.
But if you’ve never used a sander before, it can be daunting. Here are a few tips on how to use a sander for beginners.
The first thing you need to do is choose the right type of sander for your project.
There are four main types of sanders: orbital, palm, belt and disc. Orbital sanders are the most common and versatile type of sander. They’re perfect for general sanding and finishing work.
Palm sanders are smaller and easier to maneuver than orbital sanders, making them ideal for tight spaces. Belt sanders are powerful tools that can quickly remove large amounts of material. They’re typically used for rough sanding or removing paint or varnish from woodwork.
Disc Sanders have a circular disc that spins at high speeds, making them great for shaping and smoothing curves in woodwork.
Once you’ve chosen the right type of sander, it’s time to get started! Make sure you have all the necessary supplies before you begin, including safety gear like goggles and ear protection.
Sandpaper comes in a variety of grits, from coarse (60-100 grit) to fine (200-400 grit). Choose the right grit depending on the amount of material you need to remove and the smoothness of the finish you want to achieve. For example, if you’re starting with raw wood, you’ll want to use coarse paper to remove any imperfections before switching to finer paper for finishing touches.
Now that you have your supplies ready, it’s time to start using your sander! Begin by attaching your chosen piece of sandpaper onto the pad according To The Spruce Crafts instructions “How To Use an Orbital Sander”. Once secure ,turn on your sander and slowly guide it along the surface of your material in even strokes . Be careful not overlap your strokes or apply too much pressure as this could damage both your project as well as cause injury .
How Do You Get Sandpaper to Stay on a Palm Sander?
If you’re having trouble getting your sandpaper to stay on your palm sander, there are a few things you can do to fix the problem.
First, make sure that the paper is properly cut to size. If it’s too big or too small, it won’t grip the sander correctly and will come off easily.
Next, check the Velcro pads on your sander. If they’re worn out or not sticky enough, they won’t be able to hold onto the paper properly. You may need to replace them if they’re in bad shape.
Finally, make sure you’re using the right type of adhesive. Some sandpapers require special adhesives in order to stay put on a palm sander – so if yours isn’t staying on, double check which adhesive you should be using.
How Do You Attach Sandpaper to a Hand Sander?
When it comes to hand sanding, there are a few different ways that you can attach your sandpaper. The most common way is to use adhesive-backed sandpaper, which will stick directly to your sander. Another option is to use clamps or other fasteners to hold the sandpaper in place.
If you’re using adhesive-backed sandpaper, the process is pretty straightforward. Just peel off the backing and stick the paper onto your sander. Start in one corner and work your way across until the entire surface is covered.
Once it’s in place, you’re ready to start sanding.
If you’re using another method to attach your sandpaper, like clamps, you’ll need to take a few extra steps. First, cut the paper to size so that it covers the entire sander surface.
Next, position the paper on the sander and secure it with clamps or other fasteners. Finally, tighten down the fasteners until they’re snug but not too tight – you don’t want to damage the paper or sander surface.
Once your sandpaper is secured in place, you’re ready to start sanding away!
Whatever method you use to attach your paper, make sure that it’s firmly in place before starting any work. A little bit of preparation will go a long way towards getting a great finish on your project!

Credit: blog.rockwelltools.com
How to Use a Palm Sander to Remove Paint
If you’re looking to remove paint from a surface, using a palm sander is a great way to do it quickly and easily. Here’s how to do it:
1. Start by sanding down the paint with coarse-grit sandpaper until most of it is removed.
2. Switch to medium-grit sandpaper and continue sanding until the surface is smooth.
3. Finally, use fine-grit sandpaper to give the surface a nice, finished look.
4. Vacuum up any dust created from sanding before beginning to paint over the now clean surface.
Conclusion
If you’re new to woodworking or just want to improve your skills, one tool you’ll need to learn how to use is a palm sander. Palm sanders are great for smoothing out rough edges on wood surfaces and can save you a lot of time compared to hand sanding.
To use a palm sander, start by attaching sandpaper to the sander using the Velcro pads.
Then, turn on the sander and hold it against the wood surface with light pressure. Move the sander in small, circular motions until the entire surface is smooth. Once you’re finished, turn off the sander and remove the sandpaper.