No, an electric planer cannot be used as a jointer. A jointer is a woodworking tool used to create a smooth, flat surface on a piece of lumber. An electric planer is a power tool that uses rotating blades to shave off thin layers of wood from a piece of lumber.
An electric planer can be used as a jointer, but it is not the best tool for the job. A better option would be to use a handheld power drill with a jointer attachment. This will give you more control and a better finish.
Turn Your Hand Planer into a Jointer for Only $10
Table of Contents
How Do You Turn a Planer into a Jointer?
Assuming you would like a blog post discussing how to turn a planer into a jointer:It is possible to turn a planer into a jointer with some work and the right tools. The first step is to create two reference surfaces that are perpendicular to each other, which can be done by clamping the boards together and running them through the planer.
Next, use a straightedge or level placed across the boards to find any high spots that need to be taken down with handplanes or scrapers. Once the boards are flush, they can be unclamped and ran through the planer again individually to ensure they are flat.Now that both boards are flat and have perpendicular reference surfaces, they can be clamped together and brought over to the router table.
To create the rabbet that will serve as the basis for jointing, set up a 1/2″ spiral upcut bit in the router table and make several passes along each edge of both boards until you have reached the desired depth. After that, all you need to do is clean up any rough edges with sandpaper and your DIY jointer is complete!
Do I Need a Jointer If I Have a Planer?
A planer is a great tool for anyone who wants to work with wood. It can be used to create smooth, level surfaces on boards. However, a planer cannot create jointed edges.
In order to create jointed edges, you will need a jointer. A jointer can also be used to create rabbets and other types of joints.
What Can I Use If I Don’T Have a Jointer?
If you’re a woodworker, not having a jointer can be a big pain. Jointers are great for creating flat, even surfaces on your wood pieces – something that’s essential for many projects. So what can you do if you don’t have a jointer?
There are a few different options. One is to use a hand planer. This can be effective, but it’s definitely more work than using a jointer.
You’ll need to take care to plane evenly, and it’ll likely take longer to get the results you want.Another option is to use a router table. This can also create flat surfaces, but again, it takes more time and effort than using a jointer would.
Plus, you’ll need to have a good router table set-up in order for this to work well.Finally, you could try using sandpaper on your wood pieces. This isn’t ideal, as it’s very easy to create uneven surfaces with sandpaper.
But if you’re careful and take your time, it’s possible to get decent results this way – though they won’t be as good as if you’d used a jointer.
How Do You Joint Boards With a Planer?
It is important to plane your boards before jointing them together. This will ensure that the boards are flush with each other and there are no gaps between them. To plane your boards, you will need a hand planer or a power planer.
If you are using a hand planer, start by setting the blade to the desired depth. Then, hold the board firmly in one hand and guide the blade along the surface of the board in long, even strokes. Be sure to keep your strokes going in the same direction so that you don’t create any gouges in the wood.
If you are using a power planer, start by setting the depth of the cutter head. Then, feed the board into the machine while holding it firmly against the fence. The power planer will do most of the work for you, but be sure to guide it smoothly along the length of the board.
Credit: cornerfieldshop.com
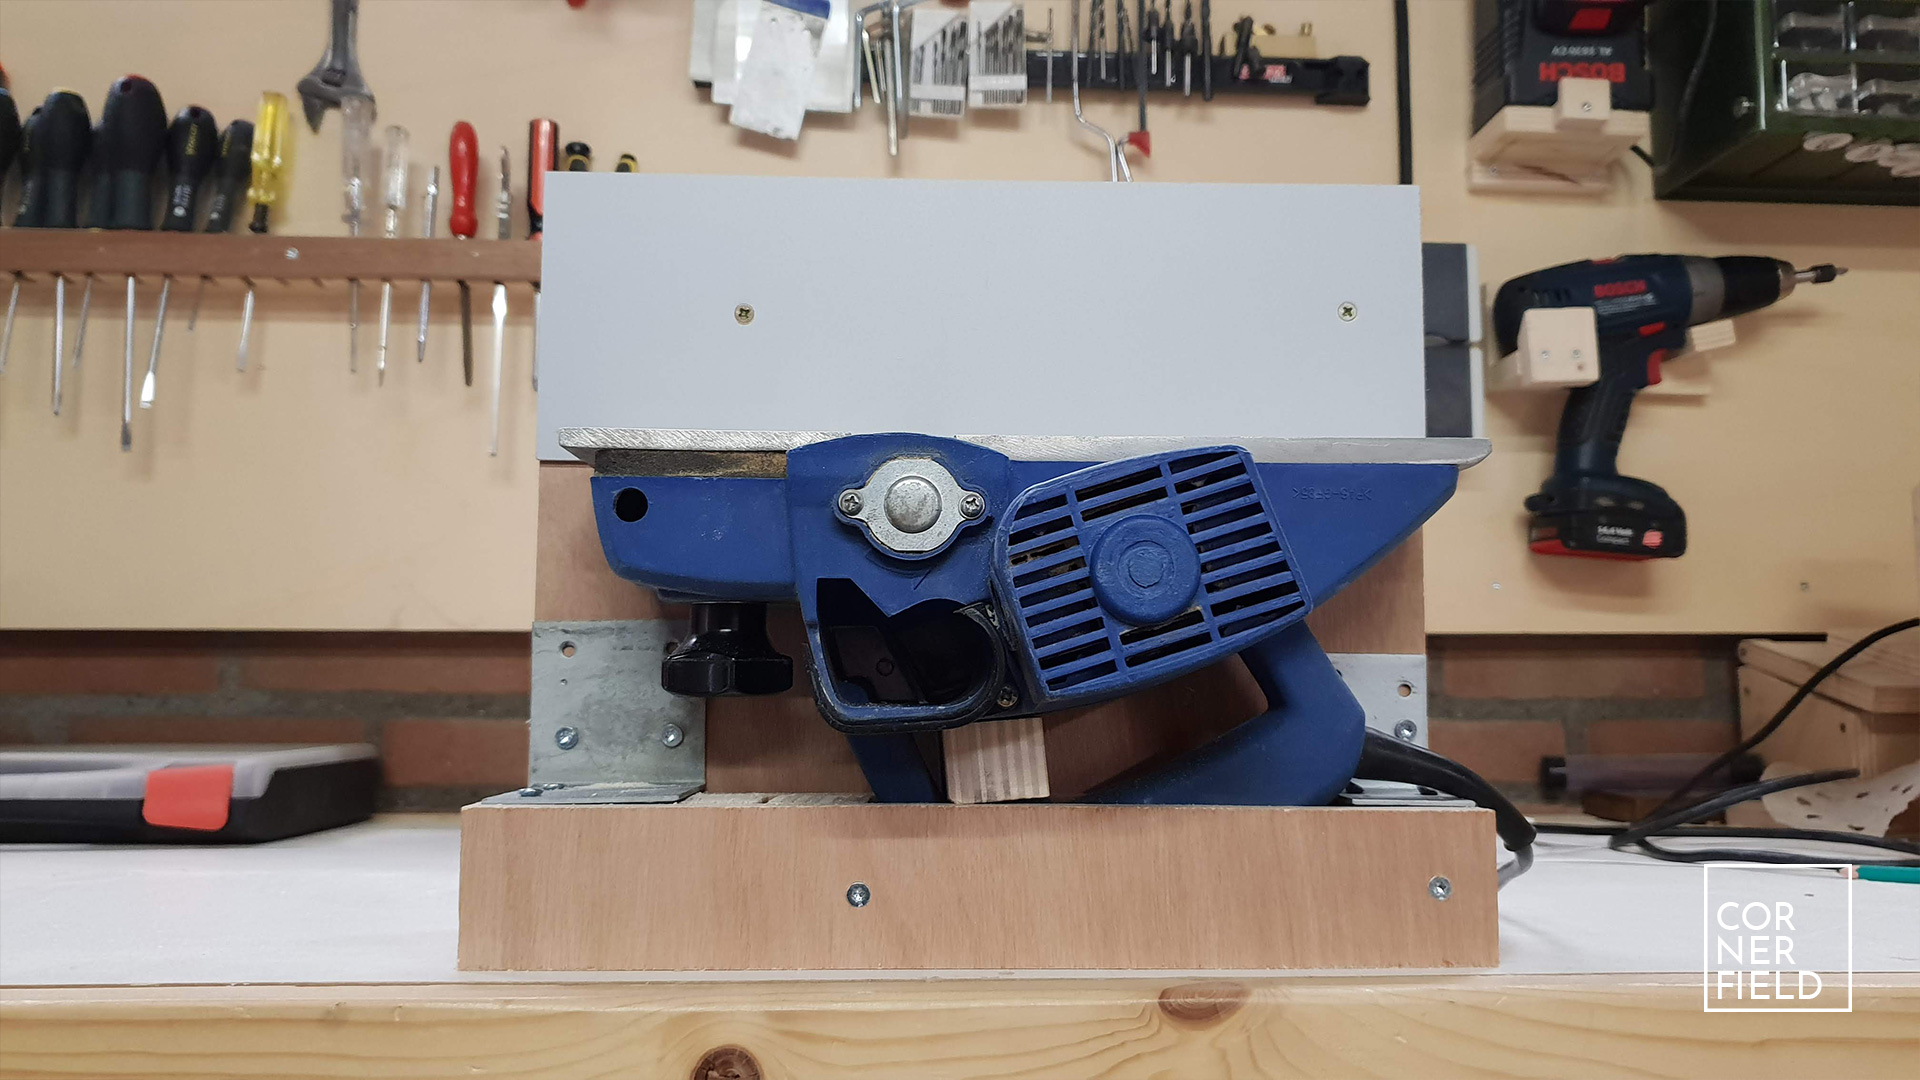
Power Planer to Bench Jointer Conversion
If you have a power planer and are looking for a way to put it to use in your woodworking shop, consider converting it into a bench jointer. This is a relatively easy conversion that can be done in just a few hours. With this setup, you’ll be able to quickly and easily joint boards for your projects.
To start, you’ll need to remove the blades from your power planer. Next, attach two pieces of scrap wood to the sides of the planer body. These will serve as the supports for your new jointer table.
Then, simply mount the power planer onto your workbench so that the table is level with the top of the bench.Now, all you need to do is add some stops to the end of the table so that your boards don’t slide off when you’re jointing them. You can make these stops out of scrap wood or purchase them commercially.
Once they’re in place, you’re ready to start jointing boards!One thing to keep in mind when using this setup is that you’ll need to plane one side of each board before running it through the jointer. But other than that, this conversion should give you years of trouble-free service!
Electric Hand Planer Tricks
When it comes to woodworking, having the right tools for the job is essential. And when it comes to hand planing, there’s nothing better than an electric hand planer. But even the best tools can be made better with a few tricks up your sleeve.
Here are some electric hand planer tricks that will help you get the most out of your tool:1. Use a sharpening stone before each use. This will ensure that your blades are always sharp and ready to go.
2. When making rabbets or other cuts that require an accurate depth, use a depth stop on your planer. This will help you achieve consistent results every time.3. To avoid tear out, Always plane with the grain of the wood, not against it.
How to Use an Electric Hand Planer As a Jointer
An electric hand planer can be a great tool for quickly and easily joining two pieces of wood together. Here are some tips on how to use an electric hand planer as a jointer:1. Place the two pieces of wood that you want to join together on a flat surface.
2. Use the electric hand planer to slowly and evenly shave off one side of each piece of wood until they are both flush with each other.3. Once both sides are flush, use the electric hand planer to slightly bevel the edges of each piece of wood so that they fit snugly together when joined.4. Apply glue to both sides of the joint, then place the two pieces of wood together and clamp them in place until the glue dries.
Conclusion
If you’re looking for a tool that can do double duty, an electric planer can be used as a jointer. While it’s not the ideal tool for the job, it can get the job done in a pinch. Here’s what you need to know about using an electric planer as a jointer.