Diy wood tool box ball bearing slides provide durability, smoothness, and convenient access to all your tools. Introducing diy projects like building a wooden tool box can be fun if you have the necessary tools, and the experience required to accomplish the task.
When it comes to storing tools, a well-crafted tool chest is necessary. Whether you plan on making one for yourself or for someone else, you should consider adding ball-bearing slides to the project as they provide numerous benefits such as making it easier to access your tools and providing dependability.
Ball-bearing slides are designed to be durable and resist corrosion, making them a good investment for long-term use. In this article, we will discuss the benefits of ball-bearing slides and how to add them to your diy wood tool box project.
Credit: www.rockler.com
Benefits Of Upgrading Your Toolbox With Diy Wood Tool Box Ball Bearing Slides
Table of Contents
Woodworkers require functional and reliable toolboxes, but with time, the drawer slides can become stuck or even begin to fall out when extended. Thankfully, upgrading your toolbox with diy wood tool box ball bearing slides is a great solution. Not only will it improve functionality, but it also makes storage and tool retrieval easier, enhances safety and convenience, and increases the longevity of your toolbox.
Improved Functionality
- Ball bearing slides allow for a smooth, easy and quiet opening and closing of drawers.
- The slides are capable of supporting significantly more load capacity than traditional slides, which means you can store more tools without worrying about damaging the box.
- The slides are made from high-quality materials, making them durable and long-lasting.
Easier Storage And Retrieval Of Tools
- With ball bearing slides, the drawers can extend fully, giving access to all your tools, making it easier and quicker to find what you need.
- Because the drawers glide smoothly, you no longer need to use excessive force to open them, reducing the risk of accidental spills or damage to your tools.
- You can customize the size and spacing of each drawer, making the tool organization a breeze, plus the ball bearing slides can accommodate even the heaviest of tools effortlessly.
Enhanced Safety And Convenience
- The ball bearing slides provide a “soft close” feature, which means you can close the drawers with ease without having to slam them.
- In case of accidental slips, drawers that close smoothly and quietly are safer than ones that jerk or suddenly slam shut.
- They are also more convenient for those who carry their toolboxes from one job site to another, as they previously would have had to secure the drawers by other means during transportation.
Longevity Of Tool Box
- The ball bearings distribute weight evenly across the slide rail, which significantly reduces wear and tear, making the slides more long-lasting and maintenance-free.
- Because the slides are made of high-quality materials, they are less prone to corrosion and rust compared to traditional slides.
- Upgrading your toolbox with ball bearing slides increases the lifespan of your toolbox by reducing the frequency of damages and the need for repair and replacements.
Upgrading your toolbox with diy wood tool box ball bearing slides is cost-effective and well worth the time and effort. It is a simple addition, yet it has multiple benefits compared to traditional slides – it enhances functionality, improves organization, and saves you time and energy.
Implementing this upgrade will make a significant difference to your woodworking experience while improving your toolbox’s longevity.
Factors To Consider Before Upgrading Your Toolbox
The Type Of Tool Box
When choosing a tool box, it’s important to consider the type of tool box you need for your specific requirements. Here are some types of tool boxes to consider:
- Portable tool boxes: These tool boxes are compact and lightweight, making them perfect for carrying around to remote job sites or for small tasks around the house.
- Rolling tool boxes: These tool boxes come with wheels, making them easy to move around. They are ideal for professional mechanics who require extensive tools.
- Stationary tool boxes: If you have a lot of tools and want a permanent storage solution, then a stationary tool box is perfect for you.
The Dimensions Of The Tool Box
The dimensions of your tool box will depend on the size and amount of tools you have. It’s essential to consider the dimensions to ensure that you have enough space to store all your tools. Here are some factors to take into account:
- Length: Measure the length of your longest tool, add the length of the handle, and add an extra inch to get the minimum length of your tool box.
- Width: Measure the width of your widest tool and add an extra inch to get the minimum width of your tool box.
- Height: The height will depend on how high your tools and equipment are. Make sure to measure the height of each item and add an extra inch to get the minimum height of your tool box.
The Weight Of Tools To Be Stored
The weight of your tools and equipment is another critical factor to consider before upgrading your tool box. If you have heavy equipment, your tool box should be strong enough to support the weight. Here are some things to keep in mind:
- Check the weight capacity of the tool box: Always check the weight capacity before purchasing a tool box to ensure that it can handle the weight of your tools.
- Consider the material of the tool box: Aluminum and steel tool boxes are the most robust and can withstand significant weight. However, they can be heavier than other materials.
The Environment In Which The Tool Box Will Be Used
The environment in which your tool box will be used is another critical factor to consider. The type of environment can affect the tools’ performance and the tool box’s durability. Here are some factors to consider:
- Humidity: If you work in a humid environment, it’s essential to choose a tool box with rust-resistant properties.
- Extreme temperatures: Extreme temperatures can affect tool performance. Choose a tool box that can withstand high or low temperatures.
- Dust and debris: If you work in a dusty environment, you may want to consider a tool box with airtight seals.
The Budget
Your budget is another crucial factor to consider. Tool boxes range in price from budget-friendly to extremely expensive. Here are some tips:
- Determine your needs: Before purchasing a tool box, determine what you need to store and find a tool box that meets those needs.
- Comparison shop: Research different brands and compare prices to find the best tool box within your budget.
- Avoid cheaply made tool boxes: Cheaply made tool boxes may seem like a good value, but they can be flimsy and not durable over time.
Steps To Upgrade Your Toolbox With Ball Bearing Slides
Preparing The Tool Box
Before beginning the upgrade process of your toolbox with ball bearing slides, a few essential measures need to be taken for preparation. These preliminary steps include:
- Clear off all the tools from the toolbox to facilitate the process.
- Check the toolbox’s condition, as it is crucial to work with an undamaged tool.
- Clean and dry the surface where the installation will take place.
Selecting The Appropriate Slides
Choosing the right size and type of ball bearing slides is an essential step in upgrading your toolbox. Here are some improvements that you should consider while selecting the slides:
- Choose the suitable slide size, taking into account the length and width of your toolbox.
- Decide whether you want a basic or full-extension slide.
- Look for the appropriate material and weight capacity that matches the tools you intend to store in the toolbox.
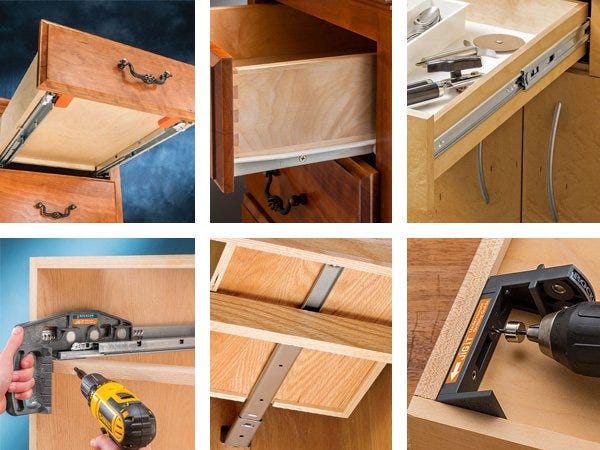
Measuring And Installation Of Slides
The installation of a ball bearing slide with dimensions and fitting requires precision. Follow the steps below for proper measurement and installation:
- Measure the length and width of the toolbox to determine the necessary length of the slide extension.
- Measure and mark accurately where the slides will go using a measuring tape and a pencil, marking the spots with an ‘x’ where you will drill.
- Attach the slides to the marked spots on the toolbox.
- Place the drawer onto the slide, ensuring that it is level.
Testing And Adjustment Of The Slides
After the installation process is complete, the next step is testing and making any necessary adjustments before the toolbox is ready for use. Follow the steps below:
- Gently slide open the drawer to check the slide’s functionality and smoothness.
- If the drawer struggles to open, remove it from the toolbox, and check any screw or bolt adjustments or any visible obstruction.
- Replace the drawer and test it again to ensure everything is functioning properly.
By following the above steps, you can easily upgrade your toolbox with ball bearing slides. With the help of the right selection of slides, accurate measurement, and proper installation procedure, your toolbox will be transformed into a professional and easy-to-use item that effectively stores your tools.
Tips For Maintaining Your Upgraded Toolbox
Diy wood tool box ball bearing slides: tips for maintaining your upgraded toolbox
A wooden toolbox is a fantastic addition to any workspace, being both functional and visually appealing. By installing ball bearing slides in your diy toolbox, you not only upgrade your tool storage capacity but also increase the convenience of access to tools.
Maintenance of the ball bearing slide is essential to get a long-lasting performance from the toolbox. Here are some tips for keeping your upgraded toolbox in top condition.
Keeping The Slides Clean And Lubricated
Keeping the ball bearing slides clean and lubricated is important for maintaining the smoothness of movement. Dirt, sawdust, and other debris can accumulate on slides over time, causing friction and leading to wear and tear. Lubrication is an essential part of maintaining the slides, and several lubricants are available, including dry lubes, silicone spray, and grease.
Follow the steps below to keep your slides clean and lubricated:
- Regularly clean the slides of the toolbox using a clean dry cloth.
- Use a soft-bristled brush to remove dirt or debris that may have accumulated on the slides.
- Apply the lubricant of your choice to the slides. Use a small amount, making sure to spread it evenly.
- Use a clean cloth to wipe off any excess lubricant.
Proper Handling And Storage Of Tools
Another crucial aspect of maintaining an upgraded toolbox is proper handling and storage of tools. Damaged or dirty tools can cause snagging or wear on the ball bearing slides. You can increase the lifespan of your toolbox by following the tips below for the proper handling and storage of tools:
- Be careful when placing or removing tools from the toolbox to avoid banging them against the slides.
- Keep your tools clean and in good condition, making sure there is no dirt or grime that can damage the toolbox slides.
- Choose an appropriate-sized toolbox to ensure that each tool has a designated spot, allowing for easy identification and retrieval.
Regular Inspection For Signs Of Damage Or Wear And Tear
It is necessary to inspect the toolbox regularly for signs of wear and tear or damage. Any signs of wear or damage should be addressed immediately to avoid further damage. Follow the tips below to inspect the toolbox regularly:
- Inspect the toolbox slides for any signs of wear and tear such as scratches, gouges, or dents.
- Check for damage or cracks on the toolbox body, corners, and edges, which may indicate improper storage or rough handling.
- Inspect the ball bearing slides’ mounting screws and bolts to ensure they are tightened and securely fastened.
Repair Or Replacement Of Damaged Slides
If there is any sign of damage to the ball bearing slides, repair or replace them immediately. Continuing to use damaged slides can cause further damage to tools and lead to expensive repairs. Follow the tips below when repairing or replacing damaged slides:
- If the slides are scratched or gouged, sand them lightly with a fine-grit sandpaper to smooth out the surface.
- For more severe damage, replace the whole slide or only the damaged parts.
- When replacing the slides, make sure to get the correct size and type of slides for your toolbox.
By following the above tips, you can maintain your upgraded toolbox and ensure that it performs as expected. Regular maintenance and inspection of ball bearing slides are essential for a long-lasting and functional toolbox.
Frequently Asked Questions On Diy Wood Tool Box Ball Bearing Slides
What Are The Benefits Of Building A Wooden Tool Box?
Building a wooden tool box provides customizability, durability, and affordability.
How Can I Improve The Drawer Functionality Of My Tool Box?
By installing ball bearing slides on the sides of the drawer, you can improve the functionality of your tool box drawer significantly.
What Tools And Supplies Do I Need To Build A Wooden Tool Box?
Basic tools such as a saw, drill, screwdriver, and measuring tape are necessary. Supplies include wood, screws, hinges, and ball bearing slides.
How Difficult Is It To Build A Wooden Tool Box With Ball Bearing Slides?
Building a wooden tool box with ball bearing slides requires intermediate woodworking skills and attention to detail.
Can I Make Adjustments To The Design Of My Wooden Tool Box?
Yes, wooden tool boxes are highly customizable, allowing you to make adjustments to the design and dimensions to fit your specific needs.
How Do I Maintain My Wooden Tool Box With Ball Bearing Slides?
Regular cleaning and lubrication of the ball bearing slides will ensure your tool box functions properly and lasts for years to come.
Conclusion
Building a tool box with ball bearing slides can be a rewarding experience for diy enthusiasts. With careful planning and a little effort, you can create a box that is not only functional but visually appealing as well. Whether you are a professional woodworker or a hobbyist, this project can provide an excellent opportunity to hone your skills and showcase your craftsmanship.
Not only that, but by following the tips and techniques outlined in this blog post, you can also ensure that your tool box lasts for many years to come. So go ahead, grab your materials, and get ready to build a tool box that will make all your friends and colleagues jealous!