Wooden furniture is a great addition to your home. Wooden furniture is versatile and can be used in any decor. It is also great for everyday use in your home.
Wood is a natural material, so it has unique properties compared to other materials. Wood is commonly used in home decor, office furniture, and flooring.
Today, there are many types of wooden furniture for sale, but not all are made from the same type of wood. There are two main types of wooden furniture. One type of furniture is made from real wood, and the other is made from veneer.
Solid wood furniture is made from solid pieces of wood. It has a hard and durable finish, making it a good choice for a long-term investment in your home. Veneer furniture, on the other hand, is made from thin layers of wood.
Veneer is a less expensive option, but it is not very durable. You will need to choose the right oil finish and other products to protect the surface of your wooden furniture. This will make the surface of the wood smooth and shiny. You can find oil finishes at any hardware store or furniture store.
How to choose the right oil finish?
Table of Contents
You can use different types of oil for different types of wood furniture. Choose an oil that will last longer on hard surfaces.
The quality of the oil is very important, so choose a good oil. When choosing an oil, choose an oil that is thick and not greasy. These two properties are important because they will help stop the oil from spreading.
You can choose the right oil by following these tips:
Buy oil based on the type of wood you want to finish.
Hardwood and softwood are two types of wood. Softwoods are sensitive to moisture and require regular maintenance, while hardwoods can tolerate moisture, while softwoods are very sensitive to moisture and require regular care.
Choose an oil that is good for your furniture.
Choose an oil that will keep the wood safe from water. You should also pay attention to the color of the oil. If you want a dark color, choose black oil. If you want a light color, choose white or clear oil.
Choose a non-toxic oil.
When choosing an oil for your furniture, make sure that it is safe for your health. You can check this online by searching for ‘non-toxic oil’.
Consider the type of wood you want to use.
There are different types of wood, and each has its own special properties. For example, alder wood is great for indoor furniture because it does not absorb moisture easily, while cedar wood is suitable for outdoor furniture.
What is the difference between drying oil and non-drying oil?
Drying oils
Properties:
- Wood hardens through a process called oxidation, which creates a thick protective layer on its surface.
- It usually takes longer to dry or set, often hours to days.
- Provides a hard, water-resistant coating.
- Examples include linseed oil, tung oil, and walnut oil.
Suitability:
- Suitable for furniture, floors, and busy areas where a strong, durable finish is needed.
- Ideal where strength and protection are important.
Non-drying oils
Properties:
- They do not harden or form into a rigid film; they remain liquid or nearly liquid.
- You need to apply them frequently for them to continue working.
- Safe for food and easy to use.
- Examples: Mineral oil, coconut oil, and olive oil.
Suitability:
- Great for cutting boards, tools, and anything that comes into contact with food.
- Good for low-maintenance jobs where frequent re-working is okay.
Key Differences
| Aspect | Drying Oils | Non-Drying Oils |
|---|---|---|
| Hardening | Harden into a solid film | Remain liquid or semi-liquid |
| Durability | Highly durable and protective | Less durable, requires reapplication |
| Curing Time | Longer (hours to days) | Does not cure |
| Common Uses | Furniture, flooring, high-traffic areas | Cutting boards, utensils, food-safe items |
Choosing the Right Oil
- Use drying oil for jobs that require a long-lasting protective finish.
- For safe and easy food use, use oils that don’t dry out.
- Knowing these differences will help you choose the best oil finish for your woodwork.
How to Test an Oil Finish on Your Wood Furniture Before You Start

Testing an oil finish will help you achieve the look and protection you want. Please follow these steps:
Prepare the surface:
- Sand the wood first with 120 grit, then with 220 grit, and then clean off the dust.
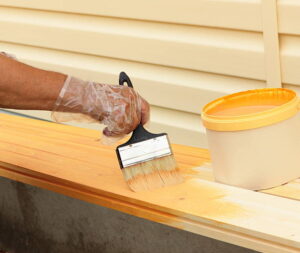
Apply the oil:
- Use a cloth or brush to apply a thin layer to a small area of the wood. Let it soak in, then wipe off the excess.
Dry and evaluate:
- Let it dry completely. Check the color, gloss, feel, and strength.
Compare different finishes:
- Test different oils on different areas and compare the results.
Final decision:
- Choose the color that best suits your style and practical needs.
Here are some tips:
- Test on a similar type of wood to your furniture.
- Use in a similar setting.
- Be patient and allow enough time for drying.
Testing saves time and helps you achieve the best results for your project.
Test different oils in different areas and compare the results.
Drying Oil
- Properties: Hardens by oxidation, creating a strong protective layer. Examples are linseed oil and tung oil.
- Suitability for any purpose: Great for furniture, floors, and busy areas where a strong, durable finish is needed.
Non-drying Oil
- Properties: Remain liquid or semi-liquid without hardening. Examples are mineral oil and coconut oil.
- Suitability for any purpose: Best for cutting boards, utensils, and items that require regular reapplication. They are food safe but not very durable.
Key points:
- Use drying oil for a long-lasting protective finish.
- Use oils that don’t dry out for safe and easy food handling.
Common mistakes to avoid when using oil finishes on wood
Using oil finishes can make wood furniture look better and last longer, but some common mistakes can ruin the results. Here’s a simple guide to avoiding common mistakes:
- Skipping surface preparation
Mistake: Using oil finishes on wood without cleaning or sanding it first.
Solution: Sand the wood until it’s smooth, starting with 120-grit sandpaper and finishing with 220-grit. Then, wipe away all dust with a damp cloth.
- Applying too much oil
Mistake: Using too much oil, which creates a sticky and uneven finish.
Solution: Apply a thin, even layer and wipe off excess oil after 10 to 20 minutes.
- Not testing the finish
Mistake: Not testing a small area or sample piece.
Solution: Always test the oil finish to make sure it looks good, is shining to your liking, and is strong enough.
- Ignoring drying time
Mistake: Moving between coats too quickly or using furniture before the finish is completely dry.
Solution: Follow the manufacturer’s recommended drying and curing times.
- Using the wrong oil for the project
Mistake: Using the wrong oil finish for the type of wood or purpose (such as using an oil that is not food-safe on cookware).
Solution: Find and choose the right oil for your needs.
- Applying in adverse conditions
Mistake: Using an oil finish in very humid or hot weather.
Solution: Work in an area where the temperature and humidity are kept at comfortable levels.
- Neglecting Maintenance
Mistake: Thinking that oil finishes require no maintenance.
Solution: Clean regularly and add oil as needed to keep them protected and looking good.
- Ignoring Safety Precautions
Mistake: Not wearing gloves, a mask, or ensuring good airflow.
Solution: Stay safe and work in an area with good airflow to avoid inhaling fumes.
By not making these common mistakes, you can get an efficient and long-lasting finish that highlights the beauty of your wooden furniture.
In Conclusion:
Choosing the right oil finish for your furniture is important because it will enhance its appearance. Oil will help protect your furniture from moisture and keep the wood looking fresh. These tips will help you choose the right oil finish for your wooden furniture.
FAQ.s: Frequently Asked Questions
What is the advantage of an 8-inch bench grinder over smaller models?
- An 8-inch bench grinder offers a larger wheel size, which provides better precision, reduced heat buildup, and longer wheel life compared to smaller models like 6-inch grinders. It’s ideal for heavy-duty tasks and professional use.
Can I use an 8-inch bench grinder for both woodworking and metalworking?
- Yes, an 8-inch bench grinder is versatile and can be used for both woodworking and metalworking tasks. However, ensure you use the appropriate grinding wheels for each material to avoid damage or accidents.
What type of grinding wheels should I use with an 8-inch bench grinder?
- For woodworking, use aluminum oxide or silicon carbide wheels for sharpening tools. For metalworking, choose wheels designed for metal grinding, such as ceramic or zirconia alumina wheels.
How do I maintain my 8-inch bench grinder for optimal performance?
- Regularly clean the grinder, check for wheel wear, and ensure the tool rests are properly adjusted. Lubricate moving parts as needed and replace worn-out wheels promptly.