A table saw miter gauge is a device used to make precise angled cuts on a table saw. The gauge is adjustable and attaches to the saw’s table or fence, allowing for accurate and repeatable cuts at various angles.
Table saws are highly versatile machines that every woodworking enthusiast should have. They can make ripping, crosscutting and angled cuts with high precision and speed, but only if used with the right accessories. One of the most important is the table saw miter gauge.
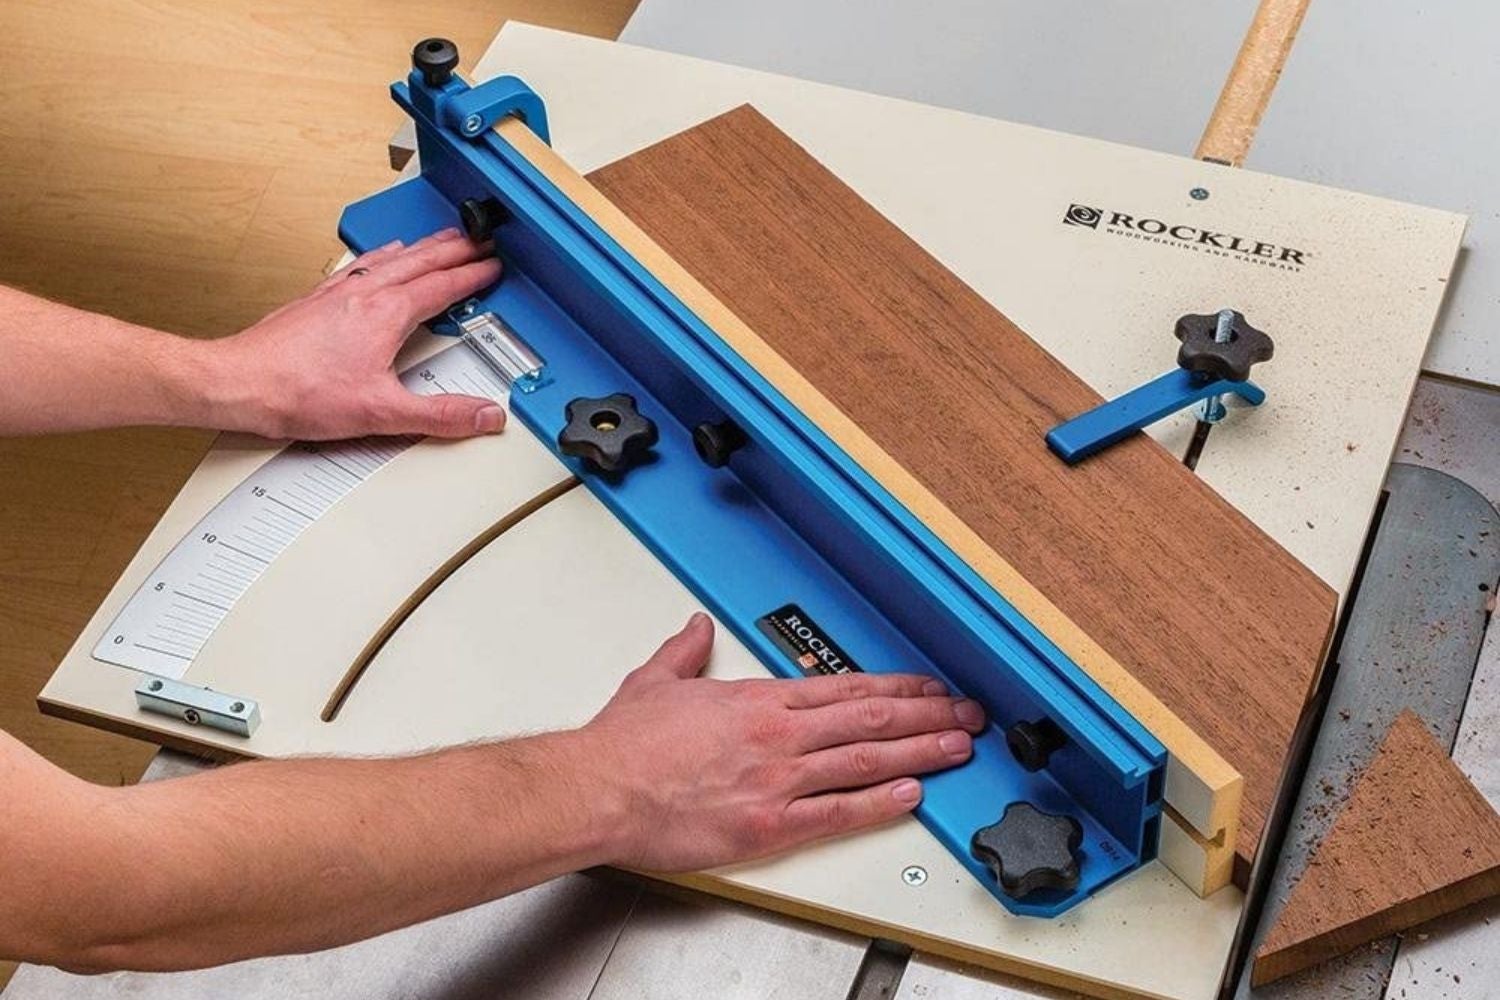
This device helps the woodworker achieve accurate angled cuts, which can be imperative when working on furniture and cabinetry. The miter gauge slides into the saw’s table or fence, and then the wood is positioned against it, making the cut at the precise angle. With the right miter gauge and practice, a woodworker can achieve perfect results every time.
Credit: www.bobvila.com
What Is A Table Saw Miter Gauge?
Table of Contents
A table saw miter gauge is a vital accessory that every woodworker needs in their toolbox. It is used to make accurate crosscuts and angled cuts on workpieces, resulting in precise and clean finishes. Without a miter gauge, it’s impossible to achieve consistent cuts or create perfect joints for your woodworking projects.
In this blog post, we will delve into the different types of miter gauges, their features, and how they work.
Definition Of A Table Saw Miter Gauge
A table saw miter gauge is a device that holds the workpiece at a specific angle to the saw blade. It functions by locking the workpiece in place while allowing it to move across the blade’s path. The miter gauge guides the workpiece as the blade cuts through it, making accurate cuts at a specific angle.
It’s essential to choose the correct miter gauge for your table saw, as it will affect the precision and accuracy of your cuts.
Discussion On The Different Types Of Miter Gauges
Table saw miter gauges come in different shapes and sizes, and each is designed to provide unique features. The most common types of miter gauges include:
- Standard miter gauge: It’s the most basic type of miter gauge and comes standard with most table saws. It has a pivoting arm that can be locked in place at different angles, making it suitable for crosscuts or angled cuts.
- T-slot miter gauge: This type of miter gauge is like a standard miter gauge, but it has a t-shaped slot that provides more stability and accuracy to the workpiece.
- Incra miter gauge: This is a precision miter gauge that allows users to make micro-adjustments to the angle with its rack and pinion system. It provides excellent accuracy and precision to workpieces.
Explanation Of The Features Of A Miter Gauge
Every miter gauge comes with different features, and here are some of the most common ones:
- Angle adjustment: A miter gauge should have angle adjustment capabilities, allowing woodworkers to make precise angled cuts, ranging from 0 to 90 degrees.
- Fence: A fence is a guide that helps to hold the workpiece straight and steady as it moves across the blade’s path, preventing any wobble during cutting.
- Locking mechanism: A miter gauge should have a locking mechanism that allows woodworkers to lock their tool in place so they can make cuts at a particular angle without deviations.
- Ergonomic handle: An ergonomic handle will help you hold and move the miter gauge comfortably, providing better control of the device.
A miter gauge is an essential tool in any woodworker’s arsenal, providing precision and accuracy in crosscuts and angled cuts. By choosing the correct miter gauge for your table saw, you can achieve professional results and complete any woodworking project with ease.
How To Use A Table Saw Miter Gauge?
Table saw miter gauges are among the most useful accessories that make woodworking tasks relatively easy and accurate. A miter gauge, paired with a table saw, helps cut wood diagonally or at a specific angle, which is ideal for making furniture.
Steps To Attach A Miter Gauge To A Table Saw
Before using a table saw miter gauge, it is essential to attach it to the tool properly. Here are the steps to attach a miter gauge to a table saw:
- Turn off the saw: Ensure that the power is off before attaching the miter gauge.
- Locate the miter slot: Find the miter slot groove on your table saw.
- Align the gauge: Insert the gauge keys into the miter slot, and use the locking mechanism to position it.
- Test the alignment: Make sure the miter gauge is straight and accurately positioned.
Guide On How To Align The Miter Gauge Accurately
Accurate alignment plays a crucial part in ensuring the miter gauge’s precise cuts during woodworking. Here is a guide on how to align the miter gauge correctly:
- Check the 90-degree angle: Make sure the gauge is set at a 90-degree angle.
- Square the fence: Place a square against the saw fence and then against the miter gauge fence to ensure they are parallel to each other.
- Calibrate the gauge: Set the gauge to zero and then pivot the machine to the desired angle using an angle finder or a digital protractor.
- Test alignment: Test the alignment of the gauge by making cuts on some scrap material.
Tips For Maintaining The Miter Gauge
To ensure that your miter gauge lasts longer and cuts properly, you need to maintain it adequately. Here are some tips for maintaining the miter gauge:
- Keep it clean: Regularly clean the miter gauge with a clean cloth to remove any sawdust or debris.
- Lubricate the gauge: Apply a lubricant such as wd-40 to the gauge’s moving parts to prevent rust and keep it running smoothly.
- Store the gauge properly: Keep it in a safe place when not in use to prevent any damage.
- Check for accuracy regularly: Check the gauge’s accuracy after every use to ensure it is still aligned correctly.
By following these guidelines, you can use a table saw miter gauge to create precise angle cuts and make your woodworking project a success.
Techniques For Accurate Cuts With Table Saw Miter Gauge
Table saw miter gauge is a versatile tool that allows you to make precise angled cuts on materials. However, not everyone knows how to use it properly. In this post, we will cover the techniques for accurate cuts with table saw miter gauge.
Let’s dive in.
Proper Positioning Of The Stock For Cutting Different Angles
Before cutting, you must position the stock correctly. Here are some guidelines to follow:
- For angles less than 90 degrees, place the stock to the left of the blade. For angles greater than 90 degrees, place the stock to the right of the blade.
- Make sure the board is flat, and its end is square.
- Use a clamp or a push stick to secure the board in place.
Explanation Of The Adjustment Mechanism Of The Miter Gauge
Understanding how the adjustment mechanism works is crucial to achieving accurate cuts. Follow these steps to adjust your miter gauge:
- Loosen the locking knob.
- Rotate the miter gauge until the pointer or the degree scale indicates the desired angle.
- Tighten the locking knob.
- Double-check the angle with a square.
Common Mistakes To Avoid While Cutting With A Miter Gauge
Mistakes are common, especially for beginners. Here are some errors to avoid:
- Placing the board in the wrong position: Ensure that the board is positioned correctly before cutting.
- Not using a push stick or a clamp: Using a push stick or a clamp keeps your fingers away from the blade and secures the board, preventing kickbacks.
- Not checking the angle: Always double-check the angle with a square before cutting.
- Rushing: Rushing leads to mistakes. Take your time and be patient.
Advanced Techniques To Achieve Perfect Cuts
If you want to achieve perfect cuts, consider trying these advanced techniques:
- Use a zero-clearance insert to create a fence for the blade, reducing tear-out.
- Create a jig for repetitive cuts, so you don’t have to readjust the angle every time.
- Use a stop block to control the length of the board.
- Use a sacrificial fence to prevent damage to the miter gauge fence.
Table saw miter gauge is a powerful tool in the hands of someone who knows how to use it properly. By following the techniques outlined above, you can achieve precise angled cuts that are necessary for many woodworking projects.
Safety Precautions While Using A Table Saw Miter Gauge
Importance Of Personal Protective Equipment (Ppe) While Using A Miter Gauge
One should never compromise on safety while operating a table saw miter gauge. Personal protective equipment (ppe) is essential to reduce the risk of accidents and injuries. Below are the ppes required while using a miter gauge:
- Eye and ear protection to prevent debris from entering the eyes and to reduce sound exposure.
- Gloves to protect hands from sharp edges and saw blade accidents.
- Dust masks to prevent inhalation of sawdust, which can cause respiratory problems.
- Long-sleeved clothing to cover the arms while operating the tool.
Discussion On The Safety Features Of Different Types Of Miter Gauges
Different types of miter gauges come with varying safety features to ensure user safety. Manufacturers design their miter gauges with unique specifications, but most have the following safety features:
- Anti-kickback pawls – these help to prevent kickbacks by clamping on the wood surface being cut.
- Blade guards – blade guards protect the saw blade from accidental contact while the motor is running.
- Laser cutting guide – a laser guide will show where the blade will cut, which prevents accidental cuts and injuries.
- Positive stops – positive stops enable users to lock the saw at common angles for repeatable cuts, thereby reducing the likelihood of accidents.
Tips For Avoiding Accidents And Injuries
Miter gauges are safe to use, but accidents can happen. Follow these tips to ensure your safety while using a table saw miter gauge:
- Keep your work area clean and organized, free from clutter and debris.
- Always inspect the saw blade before each cut to ensure it is sharp and undamaged.
- Only use the miter gauge as recommended in the manufacturer’s manual.
- Always keep your hands away from the saw blade while it’s in motion.
- Use push sticks or push blocks to feed stock through the saw blade.
- Avoid wearing jewelry or loose clothing that can get caught in the saw blade.
Remember, safety should always be the priority while using a table saw miter gauge. Always follow the manufacturer’s instructions, use personal protective equipment and maintain a safe working environment to prevent accidents and injuries.
Frequently Asked Questions Of Table Saw Miter Gauge
What Is A Miter Gauge?
A miter gauge is a device that helps woodworkers cut angled or beveled cuts on table saws.
How Do You Use A Miter Gauge On A Table Saw?
To use a miter gauge on a table saw, you need to insert the miter gauge into the slot of the saw and securely tighten it in place. Adjust the angle of the gauge to your desired degree and lock it in place before making your cut.
Why Is A Miter Gauge Important For Precision Cuts?
A miter gauge provides accurate and consistent angles, making it perfect for making repeatable cuts for frames, molding, and more. It also helps keep your hands safe and away from the saw blade while operating.
Can You Use Any Miter Gauge On Any Table Saw?
Miter gauges are generally universal and can fit in most standard table saw slots. However, check the specifications of both the gauge and the saw to ensure compatibility.
How Do You Maintain And Clean A Miter Gauge?
To maintain and clean a miter gauge, wipe it down with a clean cloth after each use. For stubborn stains or dirt, use a mild soap solution and a soft-bristled brush. Ensure proper lubrication of moving parts to prevent rusting or jamming.
Conclusion
A table saw miter gauge is a useful tool that provides precision and accuracy when working with angled cuts. It is important to ensure that the miter gauge fits and slides smoothly on the table saw, and that it is securely locked in place when in use.
The versatility of the miter gauge can be expanded with additional accessories such as extension fences or stop blocks, providing even more options for making precise cuts. Regular maintenance and cleaning of the miter gauge is also essential to ensure longevity and accuracy.
A well-built miter gauge can elevate the quality of your woodworking projects and make the process more efficient and enjoyable. Overall, taking the time to invest in a quality table saw miter gauge is well worth it for any woodworking enthusiast.