A robust, seamless, 45-degree joint can improve the appearance of your woodworking products. Miter joints, where two pieces are cut at a 45-degree angle and linked to form a corner, work well. Precision is improved by using a miter saw with changeable angle settings.
Biscuits, or splines, help strengthen the junction between the two pieces of wood. This extra step adds stability and beauty to your product. Try different wood glues or 45-degree dovetail joints to improve your woodworking skills and add individuality to your projects.
Connecting two pieces of wood at a 45-degree angle is a cool way to make your woodworking projects stronger and look nice. This old-school trick has been used for a long time to make furniture and stuff that lasts.
If you get good at it, you can make your woodworking stuff better and more solid. It’s a fun skill to learn, whether you’re just starting out or already know a lot about woodworking. It lets you create fancy designs with accuracy and style.
Checkout From Amazon
Understanding Wood Joinery Techniques
Table of Contents
Importance of Wood Joinery Techniques
Knowing how to put pieces of wood together is super important in woodworking. It helps make stuff strong and last a long time. There are different ways to do it, like using dowels or making miter joints.
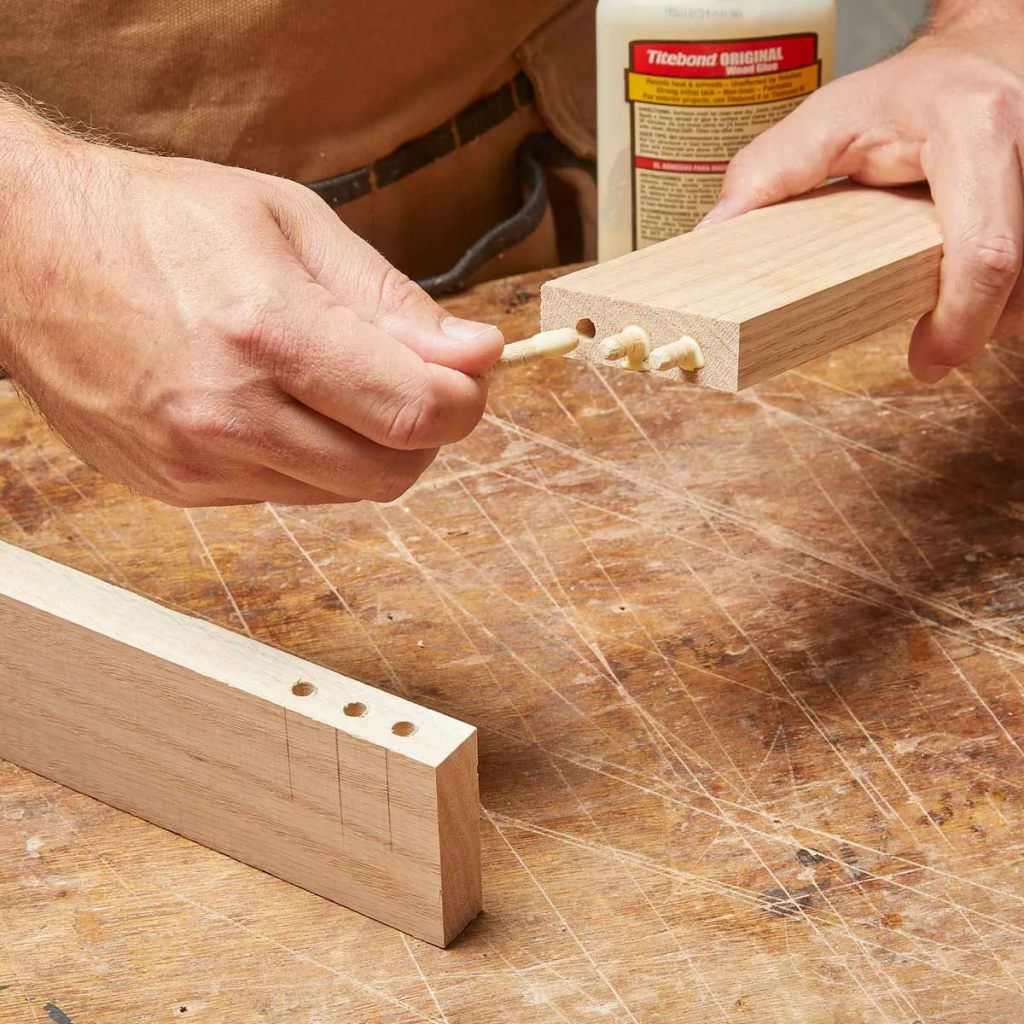
Dowels are great for connecting wood at a 45-degree angle because they give good support. You drill holes in both pieces, put glue on the dowels, and stick them in before joining the pieces. Miter joints are perfect for making corners look smooth by connecting two pieces at a 45-degree angle.
Tips for Successful Wood Joinery
To join two pieces of wood at 45 degrees, perform these steps: Use proper tools, measure carefully, choose the right glue, and let it dry. Learn how to join wood at an angle to improve projects. Learn about dowels and miter joints for solid connections.
Preparing Wood for 45-Degree Angle Joining
Sanding Wood Surface
Sand two pieces of wood before assembling them at an angle. Smooth surfaces from sanding fit together well. It prevents bumps and issues when joining. Sanding improves glue adhesion, making the connection stronger and neater. So, sanding is essential for a beautiful woodworking finish.
Accurate Measurements and Marking
Accuracy is crucial while constructing a 45-degree wood angle. Make sure the pieces fit by measuring carefully. Mark where to cut or join wood with a ruler or tape. To avoid mistakes, double-check your measurements before cutting and make sure everything fits exactly when assembled.
Tools Needed for Precise-Angled Cuts
Miter Saw
An exact 45-degree angle when connecting two pieces of wood requires a miter saw. This saw makes perfect cuts at various angles, including 45 degrees. Its adjustable blade makes clean, precise cuts.
Using a miter saw ensures that both pieces fit properly by maintaining cut angles. Cutting wood smoothly and securely on the saw table produces professional-looking joins.
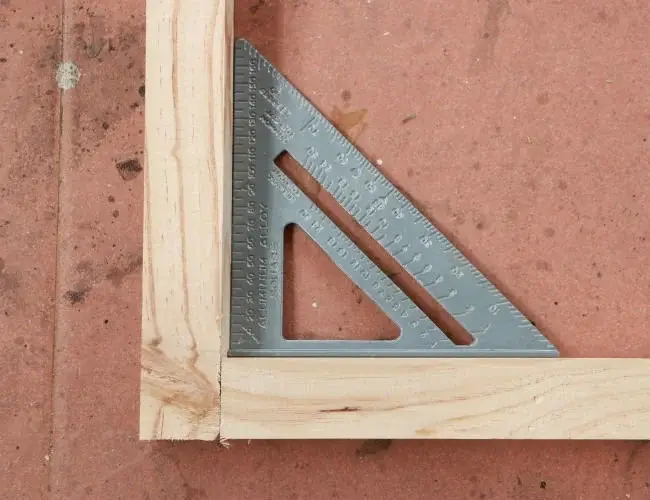
Clamps and Combination Square
To keep the wood steady while cutting, you need clamps. They hold the pieces in place, so you can make accurate cuts. A combination square helps you check if your cuts are at a 45-degree angle, making sure your project turns out just right.
Step-by-Step Guide to Cutting a 45-Degree Angle
Marking the Angle
Measure and mark a 45-degree angle on two pieces of wood to join them. Use pencil and protractor for accuracy. A precise joint can be achieved by following the mark when cutting.
Before marking the wood angle, double-check your measurements. When cutting angles for woodworking, accuracy is crucial. A small measuring inaccuracy can misalign joints.
Setting Up the Miter Saw
To cut wood at a 45-degree angle, find the knob on your saw to adjust the angle. Make sure the blade lines up with the angle on your wood. Learn how your saw works first, and check the instructions if you need help with adjusting angles.
Making the Cut
After you set up your miter saw, it’s time to cut. Clamp the wood down tight. Use both hands to guide the saw smoothly through the wood. Make sure to follow your marked line when cutting at a 45-degree angle for clean edges.
Checkout From Amazon
Methods for Joining Wood at a 45-Degree Angle
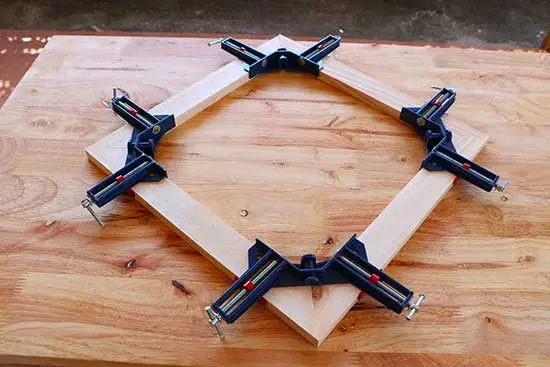
Glue and Clamps
When you want to connect two pieces of wood at a 45-degree angle, you can use glue and clamps. Put glue on the wood, stick them together at the right angle, and use clamps to hold them in place until the glue dries. This way, the wood pieces will be strongly connected.
Pros: easy and cheap. It makes a strong joint if done right.
Cons: Glue needs time to dry. Not as strong as some other methods.
Reinforcing with Screws or Dowels
To make a strong joint, use screws or dowels. Drill holes in the wood pieces, put screws or dowels in the holes, and tighten them. Screws make it strong, while dowels help without showing.
Biscuit Joinery Technique
Another way to connect wood at a 45-degree angle is with biscuit joinery. You cut slots in the wood pieces, put a biscuit with glue in them, and stick the pieces together for a strong joint.
Pros: It lines up the pieces well and makes them sturdy.
Cons: You need special tools like a biscuit joiner and more steps than regular gluing.
Tips for Achieving a Strong Joint
Applying Glue Evenly
Put glue on both sides of a 45-degree wood joint to make it robust. Stick the parts together by spreading glue evenly. Use enough glue to avoid spills and high-quality wood glue to strengthen the bond.
Using Clamps for Pressure
After gluing both components together, use clamps to press them together evenly. Clamps hold components together as glue dries. Wood sticks better when pressed uniformly.
During glue drying, clamps prevent components from shifting or crooking, which weakens the bond. Position the clamps to press evenly and ensure the components fit well.
Allowing Drying Time
After you glue and clamp the pieces together, you need to wait for the glue to dry completely. Don’t rush it! If you take off the clamps too soon, the joint might not be strong.
While waiting, make sure not to move or touch the pieces. The drying time can be different based on how humid or hot it is, so check the glue instructions for the right drying time.
Common Mistakes to Avoid in Angled Wood Joining
Inaccurate Measurements and Cuts
Wood must be measured and cut properly when joining two pieces at 45 degrees. If you mess up, the components won’t fit. Be sure to measure and cut each component correctly for a seamless connection.
Take your time measuring and use a miter saw or box for precise cuts. Remember that even a small measurement error can affect fit. So, measure again before cutting to ensure both pieces are the same size and angle.
Improper Glue Application
To ensure wood pieces hold together, use enough adhesive. Avoid overusing or underusing. Apply glue evenly to both sections. Press aggressively to distribute glue when clamping. To keep your item looking good, wipe the extra glue off with a moist cloth immediately.
Insufficient Drying Time
Before handling angled wood pieces, let the wood glue cure. Rushing may weaken the bond. Wait for the recommended time for the glue to dry.
Maintenance and Care for Angled Wood Joints
Regular Inspection
The angled wood joint must be monitored. Check for damage or looseness. If loose, your project may wobble and weaken. Check strained angled joints for wear and tear.
If you see any problems early, you can stop more damage and make sure your woodworking projects last a long time.
Regular inspection helps maintain joint integrity
Early detection prevents structural problems
Keep It Clean and Protected
It’s important to keep your wood joints clean so they last longer. Dust and dirt can get stuck in the joint, making it weaker over time. Use a soft brush or cloth to clean it often.
Put a protective finish on your wood to improve its appearance and shield it from moisture damage. Moisture can make the wood swell or change shape, which can mess up the joint. The finish helps keep your work safe from bad weather and other stuff that could ruin it.
Checkout From Amazon
Advanced Techniques for Professional Results
Using a Router with a Chamfer Bit
If you want to join two pieces of wood at a slant, use a router with a chamfer bit. It makes the joint look nice and professional. Just guide the router carefully to get the angles right. First, set up the router and adjust the depth.
Then, secure the wood and run the router along the edges to make them smooth and even. People often do this when making furniture or other cool wood projects.
Pros:
makes pretty slanted edges
Gives a professional finish
Cons:
It Needs to be done carefully and practiced
Incorporating Splines or Keys into the Joint
Splines or keys help strengthen and beautify a 45-degree wood junction. Cut slots in both woods and insert splines or keys from separate woods for strength and character.
Use a table saw or router to cut matching slots and ensure splines or keys fit tightly. This approach is used to support boxes, picture frames, and other woodworking products.
Key Information:
Enhances strength and durability
Adds visual interest to joints
Closing Thoughts
You learned about 45-degree wood joining. Take your time and be correct. Use the correct tools and follow the steps for success. Gather your tools and wood to make cool items! No matter your first blunders, keep practicing and learning. Soon, you’ll confidently create great things. Have fun woodworking!
Frequently Asked Questions
How important is it to understand different wood joinery techniques?
It’s important to know different ways to join wood so you can pick the best one for your project. This helps make sure your project is strong and lasts a long time. Each way of joining wood has good and bad points that affect how strong and long-lasting the joint is.
What mistakes should I avoid when joining wood at a 45-degree angle?
Make sure to measure and cut carefully so your pieces fit together correctly. Use clamps the right way to make strong connections. Follow all the steps to join wood at an angle correctly.
Why do we need to get the wood ready before making a 45-degree angle joint with miters?
Before making a 45-degree angle joint, you have to make sure the wood is clean and smooth. This helps the pieces stick together better and fit nicely when you put them at an angle.
What tools do you need to make perfect 45-degree cuts in wood?
You need special tools like a miter saw, combination square, marking gauge, and clamps to make sure your wooden pieces fit together at perfect 45-degree angles. These tools help you cut accurately and make your projects look really good.
How do you take care of angled wood joints?
To keep your angled wood joints in good shape, check them often for any damage. Wipe off dust and dirt with a damp cloth. Putting on some protective finish can make them last longer and look better.