A table saw fence is an important accessory for making accurate rip cuts. It is simple to make a homemade fence for a table saw using basic woodworking tools and materials. The most important part of the process is ensuring that the fence is perfectly perpendicular to the blade.
Start by cutting two pieces of lumber to the desired length of the fence. Then, use a drill and dowel jig to create four evenly spaced holes in each piece of lumber. Next, join the two pieces of lumber together using dowels and glue.
Once the glue has dried, sand down any rough edges and finish as desired.
To attach the fence to the table saw, first clamp it in place. Then use a drill to create pilot holes through both the fence and table saw top.
Finally, screw in large washer head screws until they are flush with the surface of the wood.
- Choose the type of fence you want to make
- There are many different types of fences, so make sure to pick one that will work well for your table saw
- Decide on the dimensions of the fence
- You’ll need to know how long and wide you want the fence to be
- Cut the pieces for the fence using a saw or other cutting tool
- Make sure all of the pieces are exactly the same size
- Assemble the fence by attaching the pieces together with screws or nails
- If you’re using a screw-type fastener, make sure to countersink the holes so they’re flush with the surface of the wood
- once it is completely built, Install The Fence On The Table Saw By Attaching It To The Table’s Miter Gauge Slots With Screws Or Bolts
Fence Table Saw
Table of Contents
Fence Table Saw:
A table saw is a piece of woodworking equipment that is used to make precision cuts in pieces of wood. A fence table saw has a fence attached to the table that helps guide the material being cut.
This type of saw is typically used by carpenters and other professionals who work with wood on a regular basis.

Credit: www.instructables.com
Can I Make My Own Table Saw Fence?
Assuming you have a table saw that is in good working order, making your own fence is a relatively easy task. The first step is to determine the size and shape of the fence you need. Once you have those dimensions, you can create a template out of plywood or cardboard.
After you have your template, trace it onto a piece of melamine or MDF (medium-density fiberboard). Cut out the fence with a jigsaw, and then use a router to round over the edges. Finally, attach the fence to your table saw using screws or bolts.
Making your own table saw fence is a great way to save money, and it also allows you to customize the size and shape to suit your specific needs.
How Do You Build a Straight Fence on a Table Saw?
Building a straight fence on a table saw requires careful measuring and attention to detail. Start by setting the blade of the saw at 90 degrees. Then, measure the width of the board you’ll be cutting, and mark it with a pencil.
Next, adjust the fence so that it’s exactly in line with the blade. To do this, loosen the adjustment knob and slide the fence until it’s lined up with the pencil mark. Once the fence is in place, tighten the knob to secure it.
Finally, cut along your marked line to create a straight edge.
How Can I Make My Table Saw Fence More Accurate?
If you’re looking to make your table saw fence more accurate, there are a few things you can do. First, check to see if the fence is properly aligned with the blade. If it’s not, adjust it until it is.
Next, check to see if the fence is square to the table. If it’s not, adjust it until it is. Finally, check to see if the fence is level with the table.
If it’s not, adjust it until it is. Doing these three things will help ensure that your cuts are as accurate as possible.
How Do You Make a Skill Saw Fence?
If you’re looking to make a fence for your skill saw, there are a few things you’ll need to do. First, measure the length of your skill saw’s blade. You’ll want to make sure the fence is long enough to accommodate the blade, plus a few inches on either side.
Next, use a piece of plywood or MDF (medium density fiberboard) to create the main body of the fence. Cut it to size using a circular saw or table saw, and then drill holes for any clamps or other hardware you’ll be using.
Once the main body of the fence is complete, attach your chosen material for the face.
This could be another piece of plywood, hardboard, or even laminate countertop material. Use screws or nails to secure it in place.
Finally, add any trim pieces you want and then paint or stain the entire fence as desired.
Let it dry completely before attaching it to your skill saw.
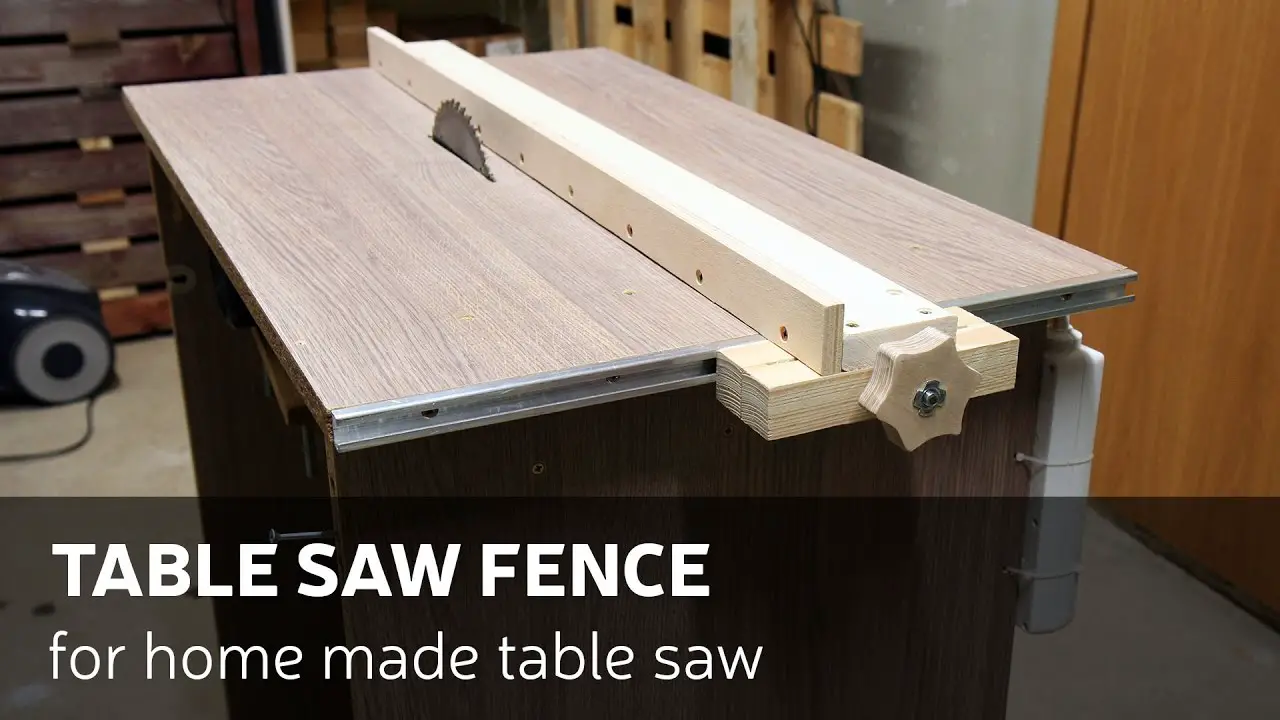
Make A Table Saw Fence For Homemade Table Saw
Conclusion
Whether you’re a professional woodworker or a DIY enthusiast, having a fence for your table saw is essential for making clean, accurate cuts. A good fence should be easy to adjust and keep the blade square to the tabletop. It should also have minimal play in order to avoid kickback and other accidents.
There are many commercially available fences, but you can also make your own with some basic woodworking skills. To make your own fence, start by cutting two pieces of lumber to the same length and width as your tabletop. Then, attach these boards together at one end using screws or dowels.
Next, install a T-track on the top edge of the fence so that you can easily attach and adjust your rip guide. Finally, add some stops or clamps to the front and back of the fence to keep your workpiece from sliding around during cuts.
With a little time and effort, you can easily make a safe and effective fence for your table saw that will help you make precise cuts every time.