To paint faux wood on a cardboard box without a graining tool, use a base coat of brown or tan paint, add grain lines using a paintbrush or comb, and dab on darker paint with a sponge for a distressed look. Painting faux wood on cardboard can be an easy and inexpensive way to achieve a rustic or vintage look for your storage or decor items.
While having a graining tool can make the process easier, it is not necessary to create the faux wood effect. By following this step-by-step guide, you can create realistic faux wood grain lines on your cardboard box without a graining tool.
With a little bit of patience and creativity, you can achieve a unique and beautiful finish for your project.

Credit: stowandtellu.com
Materials Required
Table of Contents
The key to painting faux wood on a cardboard box is having the right materials. With the following materials, you can achieve an almost authentic wood-like finish without using a graining tool.
Brown Base Paint
First and foremost, you will need a brown paint as your base coat. This should ideally be a dark shade of brown, as it will provide a contrast to the lighter wood grain shades that will be added later.
Wood Grain Tool Or Brush
Although the objective here is to paint faux wood without using a graining tool, you will need a brush or tool that can create a wood grain-like texture. In this case, a brush with broken bristles can help achieve this.
It is highly recommended to use an old brush that already has some wear and tear, as it will provide the perfect texture for the job.
White Paint
White paint is typically used to create the wood grain effect on top of the brown base paint. The white paint should have a similar consistency to that of the brown paint. A lighter shade of paint can be used for a more natural wood grain look.
Sandpaper
Sandpaper will be used to create a textured look and remove any bumps on the cardboard box. It will also help in achieving an aged look, commonly found on authentic wood surfaces.
Sealant
Lastly, it’s important to finish the painted surface with a sealant to protect it from wear and tear. This will provide a layer of protection against scratches or scuff marks, which could damage the painted surface.
With these key materials in hand, you can begin your faux wood painting project on a cardboard box. Remember to follow the appropriate steps in painting and allow time for the paint to dry before proceeding with the next stage.
With patience and perseverance, you can create an authentic-looking faux wood finish without using a graining tool.
Preparing The Surface
Painting faux wood on a cardboard box is an excellent way to create a vintage or rustic look. The good news is that you can achieve this look even if you don’t have a graining tool. With a few simple steps, you can transform a plain cardboard box into a stunning faux wood masterpiece.
In this section, we will discuss the first steps you need to take, which are vital to achieving the perfect finish.
Preparing The Cardboard Surface Using Sandpaper
Before you start painting your cardboard box, the surface should be smooth to avoid any bumps or ridges in your finished project. Follow these easy steps for preparing the surface:
- Begin by sanding the cardboard box lightly all over using 220-grit sandpaper to smooth out any bumps or ridges.
- Remove the dust from the surface with a clean, dry rag.
- Use a clean, damp cloth to wipe down the cardboard surface to absorb any remaining dust and let it dry completely.
Applying The Brown Base Paint On The Cardboard Surface
Once your cardboard box is smooth and dry, it’s time to apply a brown base coat. A brown base creates the perfect backdrop for the faux wood grain. Follow these steps to apply the base paint:
- Choose the right kind of paint for the project – a water-based acrylic paint works best for cardboard. Using a foam brush or roller, apply the brown base paint to the cardboard box.
- Allow the paint to dry for at least an hour before applying the next coat.
- Applying one to two coats of brown paint should suffice to create the right base for the faux wood finish.
Choosing The Right Kind Of Paint For The Project
When it comes to painting faux wood on cardboard, you should select a water-based acrylic paint. Acrylic paint dries fast, and it’s easy to apply. It’s also water-resistant, making it a better option for this project.
How Many Coats Of Brown Paint To Apply?
Two coats of brown paint on the cardboard surface are perfect for creating the precise faux wood grain finish. After applying each coat, wait for at least an hour before applying the subsequent coat. It’s best to be patient and ensure each coating is thoroughly dry before moving to the next step.
By following these easy steps, you will have prepared the surface and applied the base paint to create perfect faux wood finishing. The next step is creating grain patterns, which we will discuss in the following section.
Adding Wood Grains Without Graining Tool
So, you want to learn how to create a faux wood finish on your cardboard box without a graining tool. Fortunately, it’s possible to achieve a realistic wood grain texture with just a few basic painting tools and techniques. We’ll look at how to add wood grains onto your cardboard using a brush and explore the essential points that you need to know.
So, let’s get started!
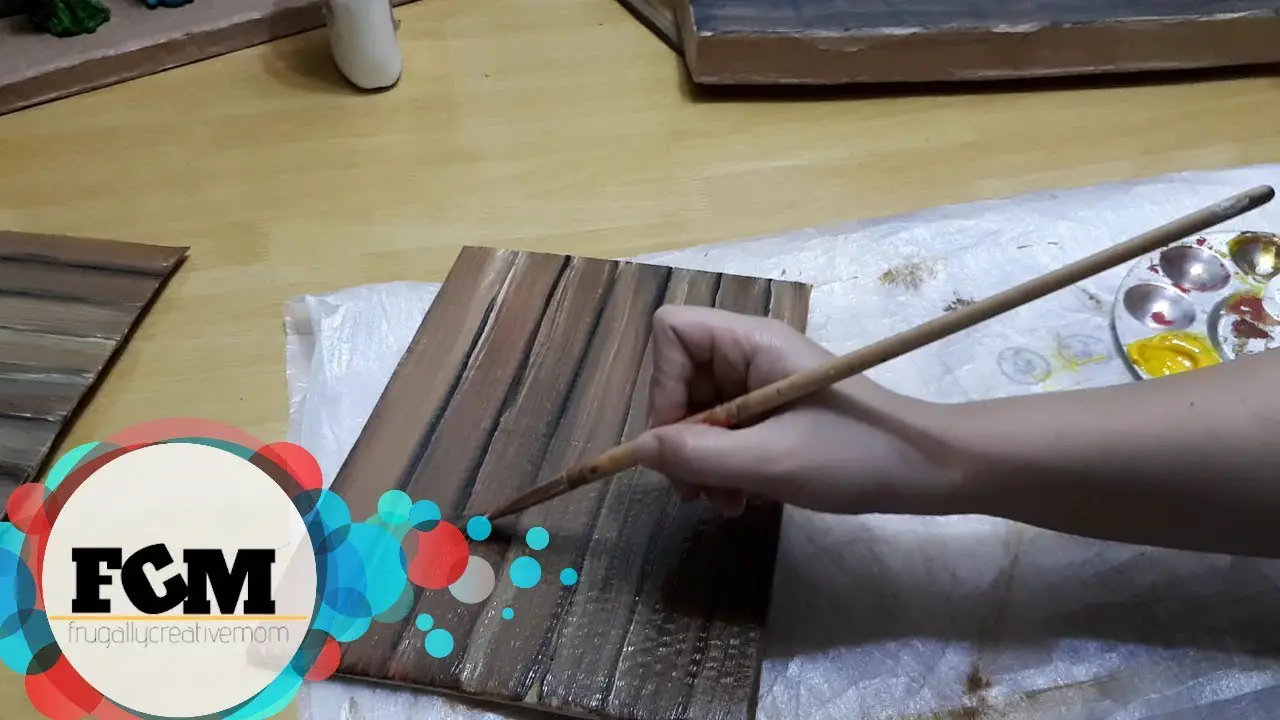
How To Create Wood Grain Texture Using A Brush?
Creating a wood grain texture is not as complicated as you might think, and you can get the desired effect with just a brush. Here’s how:
- Start with a base color of your choice. Think about the type of wood you want to create, and choose a base color that looks similar. For example, if you’re creating an oak effect, use a light tan or beige color.
- Once your base layer dries, mix a darker color. Using a fine-tipped brush, make lines and strokes that mimic wood grain patterns, starting from top to bottom in long, smooth strokes to mimic the grain of wood.
- Use a damp brush or sponge to remove any excess paint. This will result in a smoother texture that looks more like real wood.
- Repeat the process for additional layers and allow drying before proceeding to the next.
Where To Start Painting On The Cardboard Surface?
When painting on cardboard, it is essential to begin from a clean surface. Here’s where to start painting to get the most realistic wood grain texture:
- First, clean the cardboard surface with a piece of dry cloth or brush to remove any dust or debris.
- Start painting your base color, leaving the edges of the cardboard untouched.
- After your base color has dried, begin adding the patterns of wood grains. Starting from the edges of the cardboard box and working your way to the center will give it a professional look that resembles natural wood.
- Keep one thing in mind. The cardboard box’s exterior texture is not always uniform. You can take advantage of the raised edges of the box by painting over them to create the wood texture.
Best Painting Technique To Simulate The Wood Grain Texture
To get the best wood grain texture, you must use a dry brush technique. Here’s how you can do it like a pro:
- Brush in short brisk strokes to create the texture.
- Include varied pressure to produce more distinguished grain patterns.
- The dry brush can skip if it is not loaded with enough paint, so be sure to apply a proper amount.
- Remember, you can always wipe off any excess or mistakes with a damp cloth or sponge.
How To Achieve The Optimal Level Of Wood Grain Depth?
When applying paint onto a cardboard box, the texture tends to appear flat. To make your faux wood painting look like natural wood, you will need to follow these steps:
- Starting with your base color, apply a medium to dark color in areas where natural wood grain would deepen or intensify. For example, around knots or where panels might meet on a door.
- Once dried, apply the lighter base color again, but this time, only in raised areas.
- Then continue to paint wood grain patterns on top of this layered base.
- To create more depth, mix a small amount of water with a dark brown color, and brush over the base layer in areas where it would naturally darken.
We hope this guide on how to paint faux wood on a cardboard box without a graining tool helps you create beautiful, realistic patterns! With a little time, effort, and patience, you can turn an ordinary cardboard box into a realistic wood piece.
So, go ahead and give it a try!
Adding White Wash To The Surface
Faux wood painting is a crafty way of transforming plain cardboard boxes into timber-like pieces that look authentic and vintage. With the trend of vintage and rustic home designs gaining more popularity, creating your faux wood cardboard box is an excellent substitute for expensive, real-wood furniture.
In this post, we’ll explore how to add white wash to the surface of the cardboard box to simulate the wood grain pattern.
Adding White Wash To Simulate The Wood Grain Pattern
White wash is an essential element in replicating the look of wood grain. This technique’s goal is to make the surface of the cardboard box appear light and faded, creating an aged and distressed appearance. Here are some practical steps to follow:
- Choose a dry, clean, and well-ventilated workspace where you can work without interruptions.
- Create a white wash solution by mixing water and white paint with a paintbrush. The consistency should be thin enough to spread but thick enough to cover the cardboard’s natural color.
- Test the solution on a small area of the cardboard to see if the consistency is to your liking. If it’s too thick, add more water.
- Make sure that the white wash mixture’s pigment is not too strong, or it will cover the cardboard’s natural color.
- Work in sections, gradually applying the white wash mixture with a paintbrush.
Choosing The Right Consistency Of White Paint
Choosing the proper consistency of white paint is vital in creating a realistic-looking wood grain pattern. Here’s what you need to keep in mind:
- The consistency should be thin enough to spread, but thick enough to cover the cardboard’s natural color. It should not be too diluted, or it will impart a washed-out effect.
- The technique can be more complicated than it sounds, so experiment with the consistency and amount of whitewash on a small piece of cardboard.
How To Apply The White Wash On Cardboard Surface To Achieve A Realistic Wood Look?
Achieving a convincing wood look with a white wash technique is all about being patient, applying layers, and working systematically. Here are some tips:
- Use a small, flat brush or sponge for a natural, textured look. A bristled brush will leave a pronounced pattern.
- Apply the white wash mixture in long, even strokes. Make sure only one direction is followed to give the impression of wood grain.
- Let the white wash mixture dry after applying each layer. Once the layer dries, repeat the process until you achieve the desired look.
- For additional depth, consider adding gray or green tones to the white wash mixture.
Creating realistic wood grain on a cardboard box is achievable through the white wash technique. By following the tips detailed above, you can create a unique piece of décor that will fit perfectly in any vintage-inspired space.
Sealing And Protecting The Surface
Painting faux wood on a cardboard box is an excellent way to give it a touch of elegance and style. However, painting is just the first step; to make sure that the paint lasts long and remains in good condition, applying a sealant is necessary.
A sealant not only offers protection but also enhances the durability of the faux wood surface. In this section, we will discuss why it is crucial to apply a sealant and offer some tips on how to seal the faux wood on cardboard.
Applying A Sealant To Protect The Painted Surface
When you spend time and effort to create a beautiful faux wood surface using paint, it’s only natural to want it to last. Applying a sealant can protect the painted surface and prevent it from getting damaged easily. Here are a few advantages of applying a sealant:
- Prevents moisture: A sealant seals the surface, preventing moisture from seeping in. This is crucial as moisture can cause paint to peel, bubble or crack.
- Protects from wear and tear: A sealant adds an extra layer of protection and makes the surface more resistant to scratches, scuffs, and dings. This can come in especially handy for surfaces that receive a lot of use.
- Provides uv protection: Exposure to uv rays can fade the paint and damage the surface. A sealant with uv protection can safeguard the faux wood surface from this damage.
- Enhances aesthetics: A sealant gives the painted surface a glossy finish, enhancing the appearance of the faux wood.
Why Is It Essential To Apply A Sealant?
Sealing the faux wood on cardboard is a vital step in ensuring that the painted surface lasts and looks good for a long time. Here are a few reasons why it is essential to apply a sealant:
- Offers protection: A sealant protects the surface from damage and ensures that the paint does not peel off easily.
- Enhances durability: A sealant adds an extra layer of protection, making the surface more durable and resistant to wear and tear.
- Improves appearance: A sealant can enhance the appearance of a faux wood surface by giving it a glossy finish that makes it look more elegant and refined.
- Increases longevity: By providing protection and durability, a sealant can make the faux wood surface last longer, saving you the time and effort of having to repaint it frequently.
Tips On How To Properly Seal The Faux Wood On Cardboard
Properly sealing the faux wood on cardboard is essential to make it last longer and look good for an extended period. Here are some tips on how to seal the faux wood on cardboard properly:
- Choose the right sealant: Use a sealant that is compatible with the paint you used and is suitable for use on cardboard.
- Apply sealant correctly: Use a brush or roller to apply the sealant in thin, even coats, making sure to cover the entire surface.
- Allow sufficient drying time: Allow the sealant to dry according to the manufacturer’s instructions to ensure that it dries evenly and thoroughly.
- Sand between coats: Sanding between coats can help ensure that the sealant adheres properly and provides optimal protection.
- Apply multiple coats: Applying several coats of sealant can increase its durability and protection, so don’t hesitate to apply more than one coat.
By following these tips, you can seal and protect your faux wood surface effectively.
Frequently Asked Questions Of How To Paint Faux Wood On Cardboard Box Without A Graining Tool
What Is Faux Wood Painting?
Faux wood painting is a decorative painting technique that imitates the look of real wood on surfaces. Instead of using wood, paint and various tools create the pattern.
Can You Paint A Cardboard Box To Look Like Wood?
Yes, you can paint a cardboard box to look like wood using faux painting techniques. With the right paint colors and graining tools, you can simulate the look of the real wood grains.
Do You Need A Graining Tool For Faux Wood Painting?
No, you don’t need a graining tool to create the faux wood effect. You can use a dry brush to create the grainy texture and make the surface look like real wood.
What Type Of Paint Should You Use For Faux Wood Painting?
Acrylic paints work best for faux wood painting as they are water-soluble, quick-drying, and form a durable finish. You can mix different colors and shades to create different wood textures.
Can You Paint Over Previously Painted Cardboard Boxes?
Yes, you can paint over previously painted cardboard boxes with acrylic paint. You may need to sand the surface first to remove any bumps or scratches. Apply a primer coat to help the paint adhere better.
Conclusion
Now that you have learned how to paint faux wood on cardboard without using a graining tool, you can create stunning decorative pieces to enhance your home décor. Remember to select the right colors and use the techniques described in this article.
You can experiment with different cardboard box sizes and shapes to create unique and personalized designs. Try adding additional details such as knots or wood grains to make the piece look more realistic. Don’t forget to use a good quality paint and a protective sealant to ensure that the box lasts longer.
By following these simple steps, you can achieve natural-looking wood grain without breaking the bank. Have fun with your cardboard box painting projects and be sure to share your creations with friends and family!