Before you can rebuild a Bostitch roof nailer, you will need to obtain a rebuild kit. Once you have the rebuild kit, follow these steps:
1. Remove the magazine and any nails that may be left inside.
2. Unscrew the four screws holding the driver assembly in place and remove it.
3. Take out the old driver blade and install the new one that came in your rebuild kit.
4. Reassemble the driver assembly and screw it back into place.
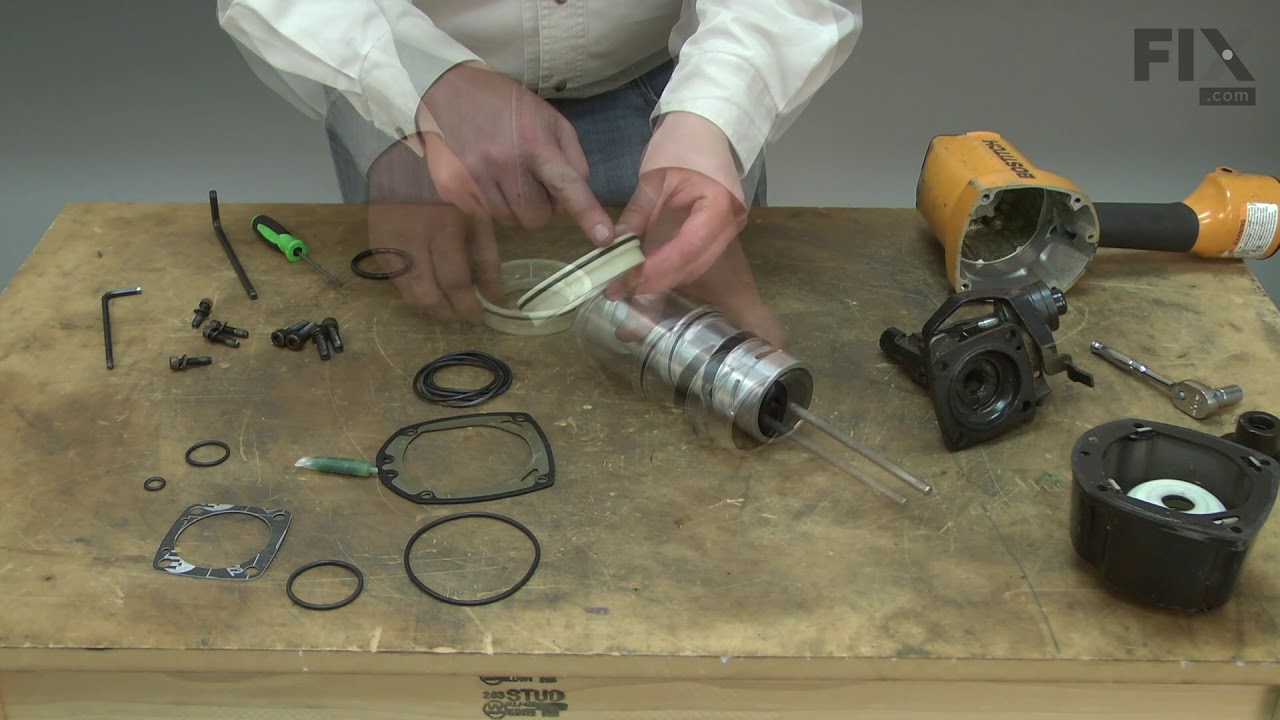
5. Replace the O-rings on the piston assembly with the new ones from your rebuild kit.
- Remove the magazine cap and unscrew the four screws that hold the magazine to the gun
- Unscrew the two screws that hold the trigger guard in place
- Pull out the trigger assembly and remove the spring that goes from the trigger to the sear
- Take out the sear and disconnect it from the trip lever arm
- Disconnect the air valve from its housing and remove it from the gun
- Unscrew seven screws holding down plate on top of gun then take off plate 7
- Remove old O-rings from cylinder and replace with new ones
- Lubricate O-rings with oil before putting them back in place 8
- Replace any other worn or damaged parts as necessary
Bostitch Nailer Repair – How to Replace the Rebuild Kit
Table of Contents
How Do You Unjam a Bostitch Roofer Nailer?
If you’re having trouble with your Bostitch roofing nailer, there are a few things you can do to try and unjam it. First, make sure that the magazine is properly loaded with nails. If it’s not, that could be the problem.
Also, check to see if there are any nails stuck in the feed mechanism. If so, carefully remove them. If neither of those solutions work, you may need to disassemble the nailer to clear the jam.
Consult your owner’s manual for instructions on how to do this.
How Do You Replace the O-Ring on a Bostitch Nail Gun?
If you’re having issues with your Bostitch nail gun, one of the first things you should check is the O-ring. The O-ring helps create a seal so that air doesn’t escape from the chamber, and over time it can wear down or become damaged. Luckily, replacing the O-ring is a relatively easy process that you can do at home in just a few minutes.
To start, gather together the following tools: a new O-ring (the same size as the one you’re replacing), some lubricant (like WD-40), and a small screwdriver or Allen wrench. Once you have your supplies, follow these steps:
1) Unplug your nail gun and remove any nails or other objects from the chamber.
Then, using your screwdriver or Allen wrench, loosen the two screws that hold the back cover in place and remove the cover.
2) Take a look at the O-ring inside – if it’s damaged or looks worn down, then it needs to be replaced. If not, you can try cleaning it with some lubricant and see if that solves the issue.
3) To replace the O-ring, simply pull out the old one and insert the new one in its place. Make sure it’s seated properly before moving on to step 4.
4) Once the new O-ring is in place, put everything back together by screwing on the back cover and tightening it down with your tool.
And that’s it! Your nail gun should now be working properly again thanks to your fresh O-ring seal.
How Do I Change the O Rings on My Bostitch Framing Nailer?
If you’re having problems with your Bostitch framing nailer, it might be due to worn out O-rings. Fortunately, changing the O-rings is a relatively easy process that anyone can do. Here’s a step-by-step guide on how to change the O-rings on your Bostitch framing nailer.
1. Start by removing the magazine from the nailer. To do this, depress the release button and then slide the magazine out of the nailer.
2. Next, use a Phillips head screwdriver to remove the two screws that hold the top cover in place.
Once those screws are removed, you can lift off the top cover.
3. With the top cover off, you should be able to see the O-rings that need to be replaced. There are three O-rings in total: one on the driving blade assembly and two on the piston assembly.
Use a pick or a small screwdriver to carefully remove each O-ring from its groove.
4. Take your new O-rings and lubricate them with a little bit of petroleum jelly before installing them in their respective grooves. Make sure that they’re properly seated in their grooves before moving on to Step 5.
5 .
How Do You Fix a Nail Gun?
If your nail gun isn’t working properly, there are a few things you can do to try and fix it. First, check to make sure that the power cord is plugged in and that the socket is providing power. Next, check to see if the air compressor is turned on and properly supplying air to the nail gun.
If both of these are working, then the problem may be with the gun itself.
There are a few things you can try to fix a nail gun yourself, but if the problem persists, you may need to take it to a professional for repairs. First, check the trigger mechanism to see if it is jammed or damaged in any way.
If so, you may be able to clear the jam or replace the damaged parts. Next, check all of the o-rings and gaskets inside the gun to make sure they are not worn or damaged. These can usually be replaced easily and cheaply.
Finally, if none of these solutions work, you may need to replace some of the internal parts of the gun such as the driver blade or firing pin assembly.
Credit: www.amazon.com
Bostitch Nail Gun Repair Shop near Me
If your Bostitch nail gun isn’t working properly, you may be wondering where you can take it to get it repaired. Luckily, there are several Bostitch nail gun repair shops located across the country. Here’s a look at some of the best places to take your Bostitch nail gun for repairs:
1. Nail Gun Depot – Nail Gun Depot is one of the leading retailers of nail guns and other tools, so it’s no surprise that they also offer repairs on Bostitch products. They have a team of experienced technicians who are familiar with all types of Bostitch nail guns, and they offer a 90-day warranty on all repairs.
2. Air Tool Repair Center – The Air Tool Repair Center is another great option for getting your Bostitch nail gun repaired.
They offer a wide range of services, including tune-ups and parts replacement, and they have experience with all types of air tools, including Bostitch products.
3. Stanley Black & Decker Service Centers – Stanley Black & Decker is the parent company of Bostitch, so you can rest assured that their service centers are familiar with repairing these products. There are several Stanley Black & Decker service centers located across the country, so you should be able to find one near you.
4. Local Hardware Stores – Many local hardware stores also offer repair services on small engines and other power tools, so they may be able to help you with your Bostitch nail gun as well.
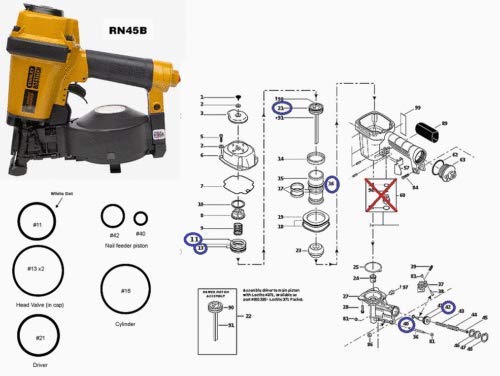
Bostitch Nail Gun Repair Kit
If you’re the do-it-yourself type of homeowner, then you know that having a reliable nail gun is essential for many home improvement projects. And when your nail gun starts to malfunction, it can be frustrating trying to figure out how to fix it. That’s where the Bostitch Nail Gun Repair Kit comes in handy.
This repair kit includes all of the essential parts that you need to fix most common problems with your Bostitch nail gun. It’s easy to use and comes with step-by-step instructions so you can get your nail gun up and running again in no time.
Whether you’re experiencing problems with jammed nails, misfires, or poor loading performance, this repair kit will help you get your nail gun back in working order.
So if you’re looking for an easy way to fix your Bostitch nail gun, this repair kit is a great option.
Bostitch Repair Parts
If your Bostitch stapler isn’t working properly, you may be able to fix it with some simple repairs. You can find most of the parts you need for these repairs at your local hardware store or online. Here are some common problems and their solutions:
Problem: The stapler won’t fire.
Solution: This is usually caused by a jammed staple. To clear the jam, open the stapler and remove any staples that are stuck in the mechanism.
If there are none visible, try gently pressing on the spring-loaded firing pin to release any hidden staples. Once the jam is cleared, your stapler should work again.
Problem: The stapled pages keep falling out.
Solution: This problem is usually caused by worn-out anvils. Anvils are the metal plates that come together to form the staple shape. Over time, they can become bent or damaged, which prevents them from forming a tight seal around the staples.
You can replace the anvils yourself with a few simple tools; just follow these instructions . With new anvils in place, your stapler should make much more secure staples.
Conclusion
If you’re looking to rebuild a Bostitch roof nailer, this guide will show you how. First, disassemble the nailer by removing the magazine assembly, drive assembly, and trigger guard. Next, clean all of the parts with compressed air and a brush.
Once everything is clean, replace any worn or damaged parts. Finally, reassemble the nailer and test it out to make sure it’s working properly. With a little time and effort, you can easily rebuild your Bostitch roof nailer.