There are a few ways to route wood without using a router. One way is to use a chisel and hammer to chip away at the wood, following the desired shape. Another way is to use a hand saw to cut along the desired line.
A third option is to use a Dremel tool with a grinding attachment to grind away the excess wood.
- Select the appropriate bit for the desired routing effect and attach it to the router
- Set up a router table or jig, if needed, to guide the workpiece along the bit safely and accurately
- Place the workpiece against the fence or stop block, aligning it with the bit as necessary
- Turn on the router and plunge it into the workpiece at the desired depth of cut
- Slowly feed the workpiece into the spinning bit, guiding it along fence or jig until complete
- Remove any rough edges with sandpaper as needed before finishing
How to Make a Wooden Router Attachment for a Drill machine. | DIY .
Table of Contents
What Can You Use Instead of a Router for Wood?
There are a few different types of wood routers, each designed for specific tasks. The most common type is the hand-held router, which is used for shaping and trimming the edges of wood. There are also plunge routers, which are used for making deep cuts into wood, and fixed-base routers, which are more accurate and precise than hand-held routers.
If you don’t have a router or can’t find one that’s suitable for your project, there are a few other tools that can be used instead. For example, you can use a chisel to shape the edges of wood or create grooves and slots. You can also use a saw to make cuts in wood, but it’s more difficult to achieve precision with a saw than with a router.
What Can You Use Instead of Router?
There are a few different ways that you can connect to the internet without using a router. One way is to use a modem and connect it directly to your computer. This will give you a direct connection to the internet, but it will be slower than if you were using a router.
Another way to connect to the internet is through a wireless network. This will allow you to connect to the internet without any cables, but it will be slower than if you were using a router.
Can I Use My Dremel As a Router?
Most people believe that a Dremel can only be used for small, delicate projects. However, with the right attachments, your Dremel can be transformed into a powerful router. While it may not have the same capabilities as a full-sized router, it can still get the job done for smaller projects.
To use your Dremel as a router, you will need to attach the following:
-A routing bit: This is the most important attachment and will determine what kind of routed edge you can create. There are many different routing bits available, so be sure to choose one that is compatible with your Dremel and that will achieve the desired results for your project.
-A depth gauge: This will help you set the depth of cut for your routed edge.
-A straightedge guide: This attachment is optional but can be helpful in keeping your routed edge straight.
Once you have all of your attachments, follow these steps to start routing:
1) Mount your Dremel on a work surface. If you are using a benchtop router table, clamp the base of your Dremel onto the table.
2) Select the appropriate routing bit and attach it to your Dremel according to the manufacturer’s instructions.
3) Set the depth gauge to determine how deep you want to cut your routed edge. Be careful not to set it too deep or you may damage your workpiece or cause kickback (when the rotating bit grabs hold of the workpiece and throws it back at you). Test out the depth on scrap wood before cutting into your final piece.
4) Place your workpiece against the straightedge guide (if using) and position it so thatthe area where you want to rout is positioned over the opening in the router table (or vice versa if working without a guide).
5) Turn on your Dremel and slowly lower it into position so thatthe routing bit comes into contact withthe surface ofyour workpiece .Gently movetheDremer backand forthto begincutting intothe wood .
Asyou rout , keepa lightbutfirm gripon themachineand maintaina slowand evenspeedtoavoiddamaging ordestroyingyourwork pieceor causingkickback .
With practice,you’ll soonbe ableto producebeautifulrouted edgeswithy ourD reme l!
How Do You Cut Grooves in Wood by Hand?
There are a few ways to cut grooves in wood by hand. The most common way is to use a chisel and mallet.
First, you will need to mark out the area where you want the groove to be.
Then, using a chisel that is slightly wider than the desired width of the groove, start at one end and strike the chisel with a mallet to make a shallow cut. Work your way along the line, deepening the cut as you go until you reach the other end.
Another option is to use a router plane.
A router plane is a hand tool that has a blade set at an angle so that it can cut grooves in wood. To use it, first mark out the area where you want the groove to be. Then, holding the router plane perpendicular to the surface of the wood, start at one end and push it along until you reach the other end.
Credit: theplywood.com
Wood Router Alternatives
If you’re in the market for a wood router, you have a few different options available to you. In this post, we’ll take a look at some of the most popular alternatives to traditional wood routers on the market today.
One popular alternative is the CNC router.
These routers are computer-controlled and can be used to create very precise and intricate designs. They’re often used in manufacturing and industrial applications, but they can also be used for woodworking projects.
Another alternative is the mini router.
These routers are much smaller than traditional wood routers and are designed for use in tight spaces. They’re perfect for small projects or for working on delicate pieces of wood.
Finally, there are cordless routers.
These routers offer all the power of a traditional router without the need for a power cord. This makes them incredibly versatile and portable, perfect for taking with you on the go or using in difficult-to-reach areas.
How to Cut Grooves in Wood by Hand
There are a few different ways that you can cut grooves in wood by hand. The most common way is to use a chisel and gouge. However, you can also use a router or even a saw.
If you’re using a chisel and gouge, the first thing you need to do is mark out the area where you want the groove to be. Then, using your chisel, make a series of shallow cuts along the line. Be careful not to go too deep – you don’t want to cut through the other side of the wood!
Once you’ve made your initial cuts, it’s time to start shaping the groove. Use your gouge to remove more wood from the center of the groove, until it’s as wide or narrow as you want it to be. If necessary, go back and forth with your chisel and gouge until the sides of the groove are nice and straight.
Routers are another option for cutting grooves in wood by hand. They’re especially useful if you need to make very precise cuts, or if you’re working with very thin pieces of wood. To use a router, simply set it up so that the bit is slightly wider than the width of your desired groove.
Then, carefully guide it along the line where you want the groove to be – being careful not to go too deep!
Finally, saws can also be used tocut grooves in wood by hand – although they’re not as commonly used as routers or chisels/gouges. The advantage of using a saw is that it’s much quicker than either of those options; however, it can be difficult to get precise results without practice.
If you decide to give it a try, just be sure that your blade is slightly wider than the width of your desired groove before getting started..
How to Cut a Slot in Wood With a Router
If you want to add a decorative touch to a piece of wood, or need to make a slot for another purpose, you can use a router. It’s important to have the right bit for the job, and to set up your router correctly before starting. With some practice, you’ll be able to cut perfect slots in wood with a router.
Here’s what you need to know about how to cut a slot in wood with a router:
1. Choose the right bit. For most slots, you’ll want to use a straight bit with an end milling cutter.
The size of the bit will depend on the width of the slot you want to create.
2. Set up your router. Attach the Router Baseplate securely to your work surface and clamp it down if necessary.
Install the chosen Router Bit into the collet, making sure that it is tight enough so that it doesn’t come loose during use but not so tight that it binds in the collet.
Set the depth of cut by loosening the Depth Adjustment Ring and moving the Router Bit up or down until it reaches the desired setting, then tightenthe Depth Adjustment Ring again so thatthe setting doesn’t accidentally get changed during use.
3 If using a plunge router, start withthe bit retracted completely by turningthe Plunge Leverto its highest position; if usinga fixed-base router, startwiththebit extended slightly beyondthe edgeofyour workpiece so thatit can clearany clamps or other obstaclesbefore beginningto cut into thematerial itself.
. 4 Positiontherouterso thatthe cutting edgeoftherouterbit is centeredoverwhereyouwanttheslotto begin,then lowertherouter carefullyinto placeby depressingthe Plunge Leveror loweringtheDepth AdjustmentRing (ifusing afixed-base router). 5 Begincuttingtheslotby activatingtherouterandmovingitforwardinthedirectionyouwanttheslottocut while maintaining aconstantdepthofcut; keepyourhandsontherouter at all times sothatyoucanstopitimmediatelyifsomethinggoes wrong.
. 6 Whenyouthinkyou’realmostfinishedcuttingtheslot(leavingjustenoughroomforaclearancefit), stoptherouterandraiseitto clearanceheightagainsothestraightbitdoesn’tdamagetheendoftheslotwhenremovingitfromthematerial..
How to Inlay Wood Without a Router
Assuming you would like a blog post discussing how to inlay wood without using a router:
Inlaying wood is a process of inserting pieces of contrasting material into cutouts in the surface of a piece of wood. The most common method for doing this is to use a router to create pockets for the inlay pieces to fit into, but it is possible to do this without using a router.
Instead, you can use hand tools to create the pockets and then glue the inlay pieces into place.
The first step is to create the outline for your inlay on the surface of the wood. You can do this freehand or use a template.
Once you have the outline, use a chisel or Dremel tool to carve out shallow pockets along the line. These pockets should be just deep enough to hold the thickness of your inlay material. If you’re using multiple pieces of inlay, make sure that each pocket is slightly deeper than the one before it so that they nest together snugly.
Once all of your pockets are carved, dry-fit your inlay pieces to make sure they fit properly. If everything looks good, remove the inlay pieces and apply glue to their undersides as well as inside each pocket. Be generous with the glue so that it seeps into any cracks or crevices.
Carefully insert each piece of inlay into its pocket and wipe away any excess glue with a damp cloth. Allow the glued-inlays to dry overnight before proceeding further.
The final step is optional, but if you want a smooth, finished look, you can use epoxy or another type of resin filler applied over top of your now dry inlays.
How to Make a Slot in Wood With a Drill
Making a slot in wood with a drill is easy if you have the right tools. First, you’ll need a drill bit that is slightly wider than the width of your desired slot. Second, you’ll need a Forstner bit or spade bit that is the same width as your drill bit.
Third, you’ll need a clamp to hold the piece of wood you’re drilling into place. Finally, you’ll need some patience and a steady hand!
To make your slot, first clamp your piece of wood securely in place.
Then, using your drill bit, bore a hole at each end of the desired slot area. Next, switch to your Forstner bit or spade bit and slowly drill out the material between the holes you just made – go slow and steady here so as not to damage the surrounding wood. Once complete, remove any excess debris from your newly-made slot and voila!
You’ve successfully cut a precise slot in wood using only a drill – impressive!
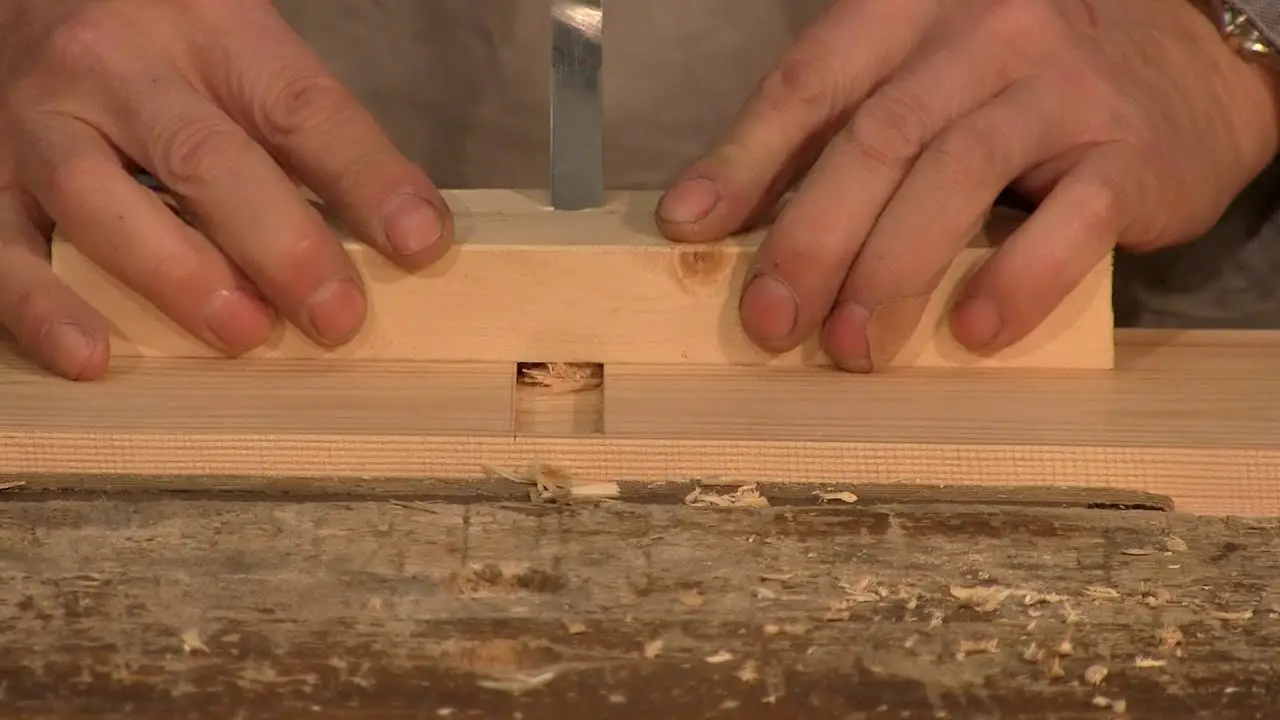
How to Cut Grooves in Wood With a Router
Routers are one of the most versatile tools in a woodworker’s arsenal. With the right bit, you can rout perfect dadoes and grooves, clean up end grain, and even carve intricate patterns. In this post, we’ll show you how to use a router to cut clean, precise grooves in wood.
The first step is to select the appropriate bit for the job. For most applications, a straight bit will work fine. However, if you’re routing on the edge of a piece of plywood or MDF, you may want to use a spiral upcut bit to prevent tear-out.
Once you have your bit selected, it’s time to set up your router table or fence. If you’re using a table saw with an aftermarket fence (like we did), simply clamp your workpiece down and adjust the fence so that the bit is centered on your mark. If you don’t have a router table handy, you can use a simple T-bar fence clamped to your workbench.
Just make sure that the distance from the center of the bit to the outside edge of the T-bar is equal on both sides.
Now it’s time to start cutting! Rout slowly at first until you get a feel for how fast or slow your particular router likes to move.
Remember: take shallow cuts (no more than 1/8″ deep per pass) until you reach your desired depth. When finished, unclamp your workpiece and admire your handiwork!
Cutting a Thin Slot in Wood
One of the most useful cuts you can make with a saw is a thin slot, also called a kerf. This cut is handy for all sorts of tasks, like creating keyholes or slots for holding shelves in place. You can even use it to create perfect-fitting joints between two pieces of wood.
The key to making a successful thin slot is to use a sharp blade and to make sure your saw is perfectly perpendicular to the piece of wood you’re cutting into. Start by setting your saw blade to the desired width of your kerf. Then, position your workpiece so that the blade will cut into the center of it.
Start by gently pressing down on the saw handle to start the cut. As you near the end of the cut, slow down and guide the blade out of the wood carefully so you don’t splinter or tear out any wood fibers. With a little practice, you’ll be able to make clean, precise kerfs in no time!
How to Cut a Slot in Wood With Dremel
Are you looking for a way to add some decorative elements to your woodworking projects? Or maybe you need to create a specific shape or size that can’t be achieved with standard tools. If so, then learning how to cut a slot in wood with a Dremel tool is a great skill to have!
The first thing you’ll need to do is gather your materials. You’ll need the following:
-Dremel tool with an abrasive cutting wheel attachment
-A piece of wood (preferably something that’s easy to work with like pine or poplar)
-Safety glasses
-Gloves (optional but recommended)
once you have everything assembled, it’s time to get started! Here’s what you need to do:
1) Put on your safety glasses and gloves.
2) Cut a straight line into the piece of wood using the Dremel and abrasive cutting wheel. The key here is to go slowly and steady your hand as much as possible.
3) Once you’ve cut through the entire thickness of the wood, change the angle of the Dremel and make another pass along the same line.
This will widen the slit slightly.
4) Continue making passes with the Dremel until you’ve achieved the desired width for your slot. Remember – go slowly!
5) When you’re finished, unplug the Dremel and put everything away. Wash your hands thoroughly if you were wearing gloves.
And that’s it! You’ve now successfully cut a slot in wood using a Dremel tool.
Conclusion
If you’re looking to add some decorative touches to your woodworking projects, a router is a great tool to have on hand. But if you don’t have one, don’t worry – you can still create routed edges without one. Here’s how:
Start by marking out the area you want to rout. Then, using a chisel and hammer, score a line along the inside of your marked area. Next, use a coping saw to cut along the scored line.
Finally, smooth out the edges with sandpaper.
With a little bit of patience and attention to detail, you can easily create routed edges without a router!