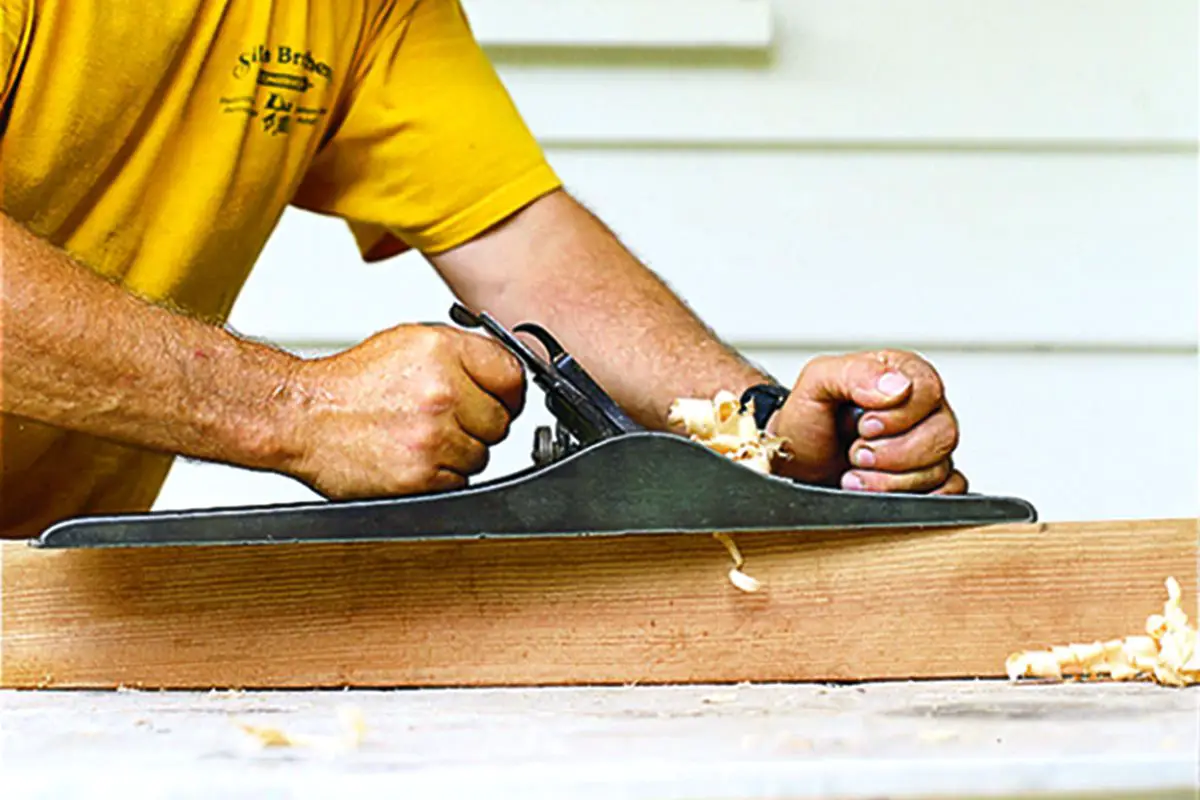
A handheld planer is a power tool that is used to smooth and level surfaces by removing small amounts of material. The tool consists of a body with a handle, an adjustable depth gauge, and a blade guard. To use the handheld planer, first adjust the depth gauge to the desired setting.
Next, hold the Planer in your dominant hand and position the blade against the surface you wish to plane. Finally, activate the Planer by depressing the trigger and moving it back and forth over the surface until it is smooth.
- Read the manual for your handheld planer before beginning
- Choose the right blade for your project
- Set up your work area and ensure that it is level
- Mark out the area you wish to plane with a pencil or chalk
- Position the planer against the wood, making sure that the blade is lined up with the pencil mark
- Apply pressure to the planer and push it forward, following the line marked out on the wood
BEGINNERS Guide to Using an Electric Planer.
Table of Contents
How Do You Use a Handheld Manual Planer?
Assuming you would like tips on how to use a handheld manual planer:
A handheld manual planer can be a great tool for quickly removing small amounts of wood from a project. Here are some tips on how to get the most out of your handheld manual planer:
1. Start by reading the instruction manual that came with your tool. This will help you understand how to properly operate the planer and avoid any potential safety hazards.
2. When you’re ready to start using the tool, clamp the workpiece securely in place so it doesn’t move around while you’re working.
3. Adjust the depth of cut according to how much material you need to remove from the surface of your workpiece. A deeper cut will remove more material but take longer, while a shallower cut will be quicker but won’t remove as much wood.
4. Guide the planer along the surface of your workpiece, keeping it level as you go.
Be careful not to apply too much pressure, which can cause the blade to tear out chunks of wood rather than making a smooth cut.
How Do Beginners Use Planers?
A planer is a great tool for any woodworker, especially beginners. Here are a few tips on how to use a planer:
1. Read the manual before using the planer.
This will help you understand how the tool works and what safety precautions to take.
2. Choose the right blade for your project. There are different blades available for different types of wood.
3. Set up the planer according to the instructions in the manual. This includes attaching the blade and setting the depth of cut.
4. Start with a small piece of wood to get a feel for how the planer works.
Slowly feed the wood into the machine and watch how it cuts.
5. Adjust your speed and depth of cut as needed when working on larger pieces of wood. Go slowly at first until you get a feel for how much pressure to apply.
Is a Handheld Planer Worth It?
Handheld planers are a great way to save time and money when working on projects that require precise, evenly-sized cuts. While they may not be the best choice for every project, handheld planers can be a wise investment for anyone who regularly works with wood or other materials that need to be cut to specific sizes. Here are some things to consider when deciding if a handheld planer is right for you:
The size of your projects – If you typically work on smaller projects, a handheld planer may be all you need. However, if you often find yourself working on larger pieces of wood, you may want to consider investing in a tabletop or standing model.
Your budget – Handheld planers can range in price from around $30 to $200+.
Obviously, the more expensive models will have more features and capabilities than the lower-priced options. However, even the most basic handheld planer can still get the job done well. It just might take a little longer.
Your level of experience – If you’re new to woodworking or don’t have much experience using power tools, a handheld planer may not be the best choice for you. These tools can be tricky to handle at first and it’s easy to make mistakes that could ruin your project. On the other hand, if you’re confident in your abilities and comfortable using power tools, then a handheld planer could definitely be worth considering.
How Do You Use a Portable Thickness Planer?
If you’re looking to do some serious woodworking, a portable thickness planer is an absolute must-have. Not only will it save you time and money by allowing you to quickly and easily plane your own lumber, but it’ll also give you the ability to achieve precision results that simply aren’t possible with hand tools. In this article, we’ll show you how to use a portable thickness planer so that you can get the most out of this versatile tool.
The first thing you need to do is set up your work area. You’ll want to make sure that you have a sturdy table or workbench that can support the weight of the planer as well as your lumber. Once you have your work surface set up, clamp your lumber in place so that it won’t move around while you’re working.
Next, adjust the depth of cut on your thickness planer according to how much material you need to remove. For most purposes, a depth of 1/8″ should be sufficient. If you’re working with particularly hard or soft woods, however, you may need to adjust the depth accordingly.
Once you’ve got the depth of cut set, it’s time to start running your wood through the planer. Start by feeding the end of your board into the infeed rollers, making sure that the board is flat against them. Then, simply turn on the machine and let it do its job!
As long as everything is aligned properly, your boards should come out perfectly flat and smooth after passing through the machine.
Portable thickness planers are an essential tool for any serious woodworker – and with a little practice, they’re easy to use too!
Credit: www.youtube.com
Using an Electric Hand Planer
An electric hand planer is a tool that is used to smooth rough surfaces or to remove excess material from a workpiece. It consists of a handle with an attached motor and a blade that spins at high speed. The user holds the planer against the surface to be smoothed and moves it in a forward motion.
There are many different brands and models of electric hand planers on the market, so it is important to do some research before purchasing one. Some factors that should be considered include the size of the unit, the power of the motor, the type of blades, and whether or not there are any special features.
When using an electric hand planer, it is important to keep safety in mind.
Always wear eye protection when operating the tool, as flying debris can cause serious injury. Also, be sure to keep hands and fingers clear of the spinning blade.
Conclusion
If you’re looking for a quick and easy way to get rid of rough edges on your woodworking projects, then a handheld planer is the tool for you. In this article, we’ll show you how to use a handheld planer to get smooth, even surfaces on your wood.
First, make sure that the surface you’re going to be working on is clean and free of debris.
Then, set the depth of the blade on your planer according to how much material you want to remove. For most applications, setting the blade to take off about 1/16″ of material at a time will work well.
Now it’s time to start planing!
Hold the planer firmly in one hand and guide it along the surface of the wood, applying even pressure as you go. The goal is to make passes over the entire surface until it’s smooth and level.
Once you’re done, take a look at your work and see if there are any areas that need more attention.
If so, simply go over those areas again with another pass or two until they’re perfect. And that’s all there is to using a handheld planer!