Pneumatic floor nailers are a great way to install hardwood floors. Here is how to use one:Attach the air hose to the floor nailer and then to an air compressor.
Be sure that the air compressor is turned off before doing this. Otherwise, you could get seriously injured.Next, load the nails into the magazine.
Make sure that they are all facing in the same direction. If they are not, they will jam up the gun.Now you are ready to start nailing!
Put your safety glasses on and hold the floor nailer against the tongue of the hardwood flooring board at a 45 degree angle. Use your other hand to trigger the gun and drive a nail into the board. Repeat this process until all of your boards are installed!
- Check that the pneumatic floor nailer is properly oiled and has enough air pressure
- Place the flooring material on top of the subflooring, making sure that the end is flush with the starting wall
- Insert a fastener into the loading chamber of the pneumatic floor nailer
- Line up the pneumatic floor nailer with where you want to place the fastener and release the trigger to fire it into place
Hardwood Floor Installation (Nail Down) Like a PRO!
Table of Contents
How Do You Use a Floor Air Nailer?
If you’re looking to install flooring in your home, you may be wondering how to use a floor air nailer. This tool is essential for attaching floorboards to the subfloor, and it’s relatively easy to use once you get the hang of it. Here’s a quick guide on how to use a floor air nailer:
1. Start by connecting your air compressor to the floor air nailer. Make sure that the pressure regulator is set to the correct PSI for your project.2. Place a board against the wall or other starting point, and position the end of the board at least 6 inches away from any obstruction.
3. With one hand, hold down the board while using your other hand to depress the trigger on the air nailer. Be sure to keep your fingers clear of the path of the nails!4. Continue holding down the board as you move across its length, depressing the trigger every few inches or so to drive in nails along both edges ofthe boards until it is fully attachedto Thesubfloor .
If Youare installing multiple boards , make sure that each oneis butted up snugly againstthe previousboardbeforenailing itinto place . You can alsouse shims toprevent gaps between boards if necessary .5When all ofthe boards are in place , go backand check eachone To ensure Thatallofthe nails have been driven flush withThe surfaceofThe board .
How Do You Put Nails in a Floor Nailer?
When it comes to nailing planks to a subfloor, the biggest challenge is often keeping the nails straight. A floor nailer can help with this, but only if you know how to use it properly. Here’s a quick guide on how to put nails in a floor nailer:
1. Start by loading the nailer with the proper size and type of nails. Make sure that the nails are facing the right direction before you load them into the magazine.2. Place the tip of the nailer on the edge of the plank where you want to start nailing.
Be careful not to press too hard, as this can damage both the plank and the subfloor beneath it.3. Pull back on the handle until it clicks into place. This will cock the hammer inside of the nailer and make it ready to fire.
4. Gently squeeze the trigger to drive a nail into the board. Repeat this process until all of your boards are securely fastened down.
How Do You Use a Brad Nailer on Hardwood Floors?
If you’re planning to install hardwood floors in your home, you may be wondering how to best go about it. One option is to use a brad nailer. This tool can be used to attach the boards to the subflooring, providing a secure and durable connection.
Here’s a step-by-step guide on how to use a brad nailer for hardwood floors:1. Begin by attaching the base plate of the nailer to the flooring. Make sure that the plate is level and flush with the surface of the wood.
2. Insert a brad into the loading chamber of the nailer. Be sure that the point of the brad is facing downwards.3. Use your thumb to press down on the top of the loading chamber, which will drive the brad into place.
4. Place your hand over the end ofthe board that you’ll be nailing and align it with where you want itto go onthe flooring beneath it .5 Guidethe tipof thenailer alongthe edgeoftheright sideofthe board asyou holditdownwithyour otherhandandsqueezeThe triggerto release thenailinto The wood .6 Repeat steps 4 through 6 until allof The boards are securely in place .
What Nail Gun Should I Use for Flooring?
When it comes to nailing down flooring, there are a few different types of nail guns you could use. The most common and popular type of nail gun for this job is the pneumatic nail gun, which uses compressed air to drive nails into the flooring. If you don’t have access to an air compressor, you can also use a manual or electric nail gun.
Assuming you’re using solid hardwood flooring boards, you’ll want to look for a pneumatic nailer that can shoot 1-1/2″ to 2″ finishing nails. These will be just the right size for most hardwood boards. You’ll also want to make sure your nail gun has enough power to drive the nails all the way into the subfloor without bending them.
If you’re using engineered hardwood or laminate flooring planks, you’ll want a different type of fastener altogether. Most of these floors are designed to be floated on top of the subfloor, so they shouldn’t be attached with nails at all. Instead, look for a pneumatic stapler that uses staples specifically designed for floating floors.
These will usually be 1/4″ crown staples in lengths ranging from 1/2″ to 1″.No matter what type of flooring you’re using, always test your fastener in a scrap piece of wood before nailing it into your new floors! This will help ensure that everything is set up correctly and avoid any costly mistakes.
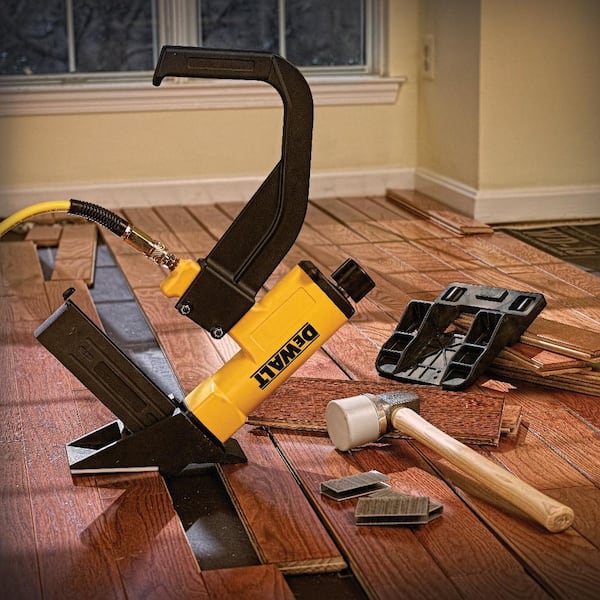
Credit: www.homedepot.com
Manual Floor Nailer
When it comes to nailing down flooring, a manual floor nailer is the best tool for the job. This type of nailer uses a mallet to drive nails into the flooring, which gives you more control over the process and ensures that the nails are properly driven into the material.There are several different types of manual floor nailers on the market, so it’s important to choose one that is compatible with your particular type of flooring.
There are also different sizes available, so you’ll need to make sure you select one that can accommodate the thickness of your floors. Once you have the right nailer for your project, simply follow these steps to get started:1. Position the nailer against one end of the boards you’re hoping to install.
Make sure that the board is properly positioned in relation to where you’ll be driving in the nails.2. Use a measuring tape or ruler to ensure that each board is placed at an even distance from its neighbor before nailing them down. Uneven gaps will result in an uneven finish.
3) Gently tap on each board with your mallet until it’s flush against its neighbors. Do not hammer too hard or you risk damaging both your floors and your nailer.4) With everything positioned correctly, start driving nails into each board at about a 45-degree angle using moderate force.
You want them driven in deep enough so they won’t come loose over time, but not so deep that they split the wood. If necessary, use a piece of scrap wood as a spacer under your mallet head to avoid damage to delicate floors like bamboo or engineered hardwood . 5) Repeat this process until all boards are installed and secure!
Cordless Floor Nailer
When it comes to nailing down your flooring, a cordless floor nailer is a great option to consider. This type of nailer is powered by batteries, so there’s no need for a power outlet or extension cord. That means you can use it just about anywhere, including in tight spaces or outdoors.
Cordless floor nailers also tend to be lighter and more maneuverable than their corded counterparts.If you’re thinking about using a cordless floor nailer, here are a few things to keep in mind:Choose the right nails: Most cordless floor nailers use 16-gauge cleat nails.
Be sure to check what size nails your nailer uses before purchasing them. You don’t want to end up with the wrong size!Load the nails correctly: Make sure the nails are facing the right direction before loading them into the nail gun.
If they’re not, they could jam the gun and cause damage.Test fire first: Before you start nailing down your floors, test fire the gun into a piece of scrap wood to make sure everything is working properly. This will help you avoid any potential accidents.
Floor Nailer Rental
Are you considering a floor nailer rental? Here’s what you need to know.A floor nailer is a specialized tool that helps install hardwood floors.
It can be used to install both solid and engineered hardwood floors. While most people hire professional contractors to install their hardwood floors, some do-it-yourselfers attempt this project themselves. If you’re considering a DIY installation, you may be wondering if it’s worth it to rent a floor nailer or just buy one outright.
Here are some things to consider:1. The cost of renting vs. buying. Floor nailers can be expensive, so renting may be the more cost-effective option for your project.
However, keep in mind that you’ll also need to rent additional tools like a power drill and saw if you don’t already own them.
2. The time commitment involved. Installing hardwood floors is not a quick project—you’ll need to factor in several days (or even weeks) of work depending on the size of your space.
3. The level of difficulty involved. If you’ve never installed hardwood floors before, it’s probably best to leave this project to the professionals—attempting it yourself could result in costly mistakes (and possibly even injury).
4 .
Your access to help/assistance . If something goes wrong during the installation process, will someone be available to help you troubleshoot? If not, again, it’s probably best to hire a professional contractor who can deal with any issues that arise .
So , what’s the bottom line ? Weigh the costs and benefits carefully before deciding whether or not to rent a floor nailer for your next hardwood flooring project .
Conclusion
If you’re looking for a quick and easy way to install hardwood floors, a pneumatic floor nailer is the way to go. Here’s how to use one:1. Start by attaching the air hose to the floor nailer and connecting it to an air compressor.
2. Next, load the nails into the magazine of the floor nailer. Make sure that the nails are facing point-side down.3. Place the floor nailer against the first board that you want to install and position it so that the tip of the nail is in line with where you want the hole drilled.
4. Pull back on the handle of the floor nailer until it clicks into place and then squeeze the trigger to drive in the nail. Repeat this process for each board that you want to install.