A table saw jointer jig is a tool used with a table saw to create smooth, straight edges on lumber. It provides accuracy and precision for joining boards together.
A table saw jointer jig is a valuable tool for woodworkers that enables them to create smooth and straight edges on lumber. This tool is typically used in conjunction with a table saw and offers accuracy and precision when joining boards together.
By utilizing a table saw jointer jig, woodworkers can achieve seamless and professional-looking joints in their woodworking projects. This not only enhances the overall quality of the finished piece but also ensures a secure and reliable bond between the boards. Whether you are a professional woodworker or a DIY enthusiast, a table saw jointer jig is an indispensable tool that will elevate your woodworking capabilities to the next level.
Why You Need A Table Saw Jointer Jig
Table of Contents
A table saw jointer jig is an essential tool for any woodworking enthusiast or professional. With its many benefits and improved performance, using a table saw jointer jig can greatly enhance your woodworking projects. In this article, we will explore the reasons why you need a table saw jointer jig, and how it can help you improve the quality of your cuts, reduce the risk of inaccurate and uneven cuts, and save you time and effort in your woodworking projects.
Improve the quality of your woodworking cuts
One of the main reasons why you need a table saw jointer jig is to improve the quality of your woodworking cuts. Without a jointer jig, it can be challenging to achieve straight and smooth cuts, especially when working with longer pieces of wood. Uneven cuts can result in a piece that doesn’t fit well or looks unprofessional.
However, with a table saw jointer jig, you can easily straighten the edges of your workpiece, ensuring a precise and accurate cut every time. The jig acts as a guide, allowing you to run your workpiece along its flat surface, removing any imperfections and creating a perfect edge. This means your woodworking projects will have clean, straight cuts, resulting in a professional and finished look.
Reduce the risk of inaccurate and uneven cuts
Another major benefit of using a table saw jointer jig is that it significantly reduces the risk of inaccurate and uneven cuts. When using a table saw alone, there is always a chance of slight misalignment or human error, leading to cuts that are not perfectly straight or parallel. These imperfections can affect the overall fit and appearance of your project.
By utilizing a table saw jointer jig, you can eliminate this risk. The jig’s design ensures that your workpiece is held securely in place, preventing any movement or shifting during the cutting process. This stability allows you to make precise, even cuts without worrying about inaccuracies or variations in the thickness of the cut. With a jointer jig, you can achieve consistent and accurate cuts every time, guaranteeing a professional finish for your woodworking projects.
Save time and effort in your woodworking projects
Investing in a table saw jointer jig can also save you valuable time and effort in your woodworking projects. Without a jointer jig, you would need to manually flatten and straighten the edges of your workpiece using alternative methods or tools. This can be a time-consuming and labor-intensive process, especially when working with larger or irregularly shaped pieces of wood.
However, with a table saw jointer jig, the flattening and straightening process becomes quick and effortless. The jig’s design allows you to easily and efficiently create flat and straight edges, reducing the need for manual labor and saving you precious time. Additionally, the jig’s accuracy ensures that each cut is consistent, eliminating the need for repeat attempts or adjustments, further enhancing your productivity.
In conclusion, a table saw jointer jig is a valuable tool that can greatly improve your woodworking projects. It helps you achieve clean, straight cuts, reduces the risk of inaccuracies, and saves you time and effort in the process. By investing in a table saw jointer jig, you can elevate the quality of your woodworking and enjoy the precision and consistency it brings to your projects.
Understanding The Table Saw Jointer Jig
A table saw jointer jig is an essential tool for woodworkers looking to achieve precise and smooth edges on their boards. Whether you are a professional carpenter or an enthusiastic DIYer, understanding how this handy tool works and what features to consider can help you make an informed decision when purchasing one.
How the table saw jointer jig works
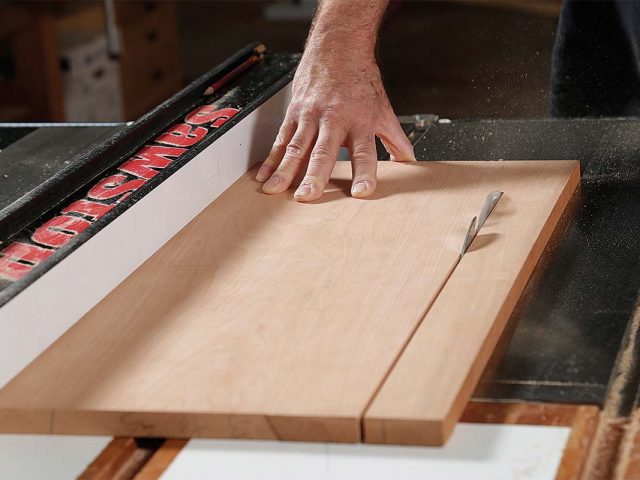
The table saw jointer jig is designed to be used in conjunction with your table saw, allowing you to flatten the edges of your boards. It consists of a sled-like platform that holds your workpiece securely in place. By sliding the jig along the table saw fence, you can achieve consistent, straight cuts that result in perfectly jointed edges.
Different types and designs of table saw jointer jigs
There are several types and designs of table saw jointer jigs available in the market. Some jigs are specifically made for certain table saw models, while others are more universal in their design. Here are a few common types:
| Type | Description |
|---|---|
| Standard Jig | A basic jig that works well for most projects and is compatible with various table saws. |
| Micro-Adjustable Jig | This type of jig allows for precise adjustments, ideal for fine woodworking tasks. |
| Taper Jig | A jig specifically designed for creating tapered cuts on your workpieces, giving you more versatility. |
Key components and features to look for in a table saw jointer jig
When choosing a table saw jointer jig, there are several key components and features you should consider. These factors will determine the jig’s overall performance and ease of use. Here are some important features to look for:
- Sturdy construction and durability
- Secure clamping mechanism to hold your workpiece firmly
- Adjustable infeed and outfeed fences to accommodate different board sizes
- Smooth sliding action for easy maneuverability
By taking these components and features into account, you can select a table saw jointer jig that will meet your woodworking needs and deliver excellent results.
Step-By-Step Guide To Using A Table Saw Jointer Jig
In this step-by-step guide, we will walk you through the process of using a table saw jointer jig to ensure precise and aligned cuts. By using this handy tool, you can achieve perfectly straight edges on your workpieces, resulting in professional-looking projects. Let’s dive in!
Setting up the table saw jointer jig
Before you begin using the table saw jointer jig, it is important to set it up correctly. Here’s how:
- Place the jig on the table saw’s surface, ensuring it is flush against the rip fence.
- Secure the jig in place using the clamps provided or any other suitable fasteners, ensuring it is stable and won’t move during operation.
- Double-check that the jig is parallel to the saw blade, using a ruler or a reliable measuring device.
Aligning the jig with the table saw blade
Proper alignment of the jig with the table saw blade is crucial for accurate cuts. Follow these steps to ensure alignment:
- Turn on the table saw and let it reach its full speed.
- With the blade spinning, carefully adjust the position of the jig until it is parallel to the saw blade.
- Use a push stick or a similar tool to move the workpiece along the jig and over the blade, ensuring it maintains steady contact and doesn’t wobble.
Proper techniques for using the jig to achieve perfectly aligned cuts
Using the table saw jointer jig correctly will help you achieve consistent and accurate cuts. Follow these techniques:
- Position the workpiece against the jig with the desired edge to be cut facing the blade.
- Apply steady and even pressure against the jig while slowly pushing the workpiece through the blade, ensuring smooth and controlled movement.
- Always maintain a firm grip on the workpiece and keep your hands at a safe distance from the blade.
- After each pass, check the cut for accuracy and make any necessary adjustments to the jig or workpiece positioning.
By following these step-by-step instructions and using proper techniques, you can leverage the table saw jointer jig to achieve perfectly aligned cuts for your woodworking projects. Remember to prioritize safety throughout the process and take your time to ensure the best results.
Troubleshooting Common Issues With Table Saw Jointer Jigs
When it comes to using a table saw jointer jig, it’s not uncommon to encounter a few issues along the way. In this section, we will discuss some of the most common problems that you may face and provide practical solutions to troubleshoot them. By understanding these issues and how to overcome them, you can ensure that your table saw jointer jig performs optimally and delivers the desired results.
Dealing with Misaligned Cuts
Misaligned cuts can be frustrating, as they can compromise the accuracy and quality of your woodworking projects. Fortunately, there are a few steps you can take to address this issue:
- Check the alignment of your table saw blade and fence. Ensure that they are parallel to each other to prevent any deviation in the cut.
- Inspect the jointer jig itself for any signs of misalignment. Look for any loose or broken components that may affect its performance.
- Adjust the jig’s positioning on the table saw. Make sure that it is securely attached and positioned correctly to avoid any misalignment during operation.
- Use a reliable measuring tool to verify the accuracy of your cuts. By double-checking your measurements, you can identify and correct any misalignments before they become a bigger problem.
Preventing Kickback and Other Safety Concerns
When using a table saw jointer jig, safety should always be a top priority. Kickback can occur if the workpiece becomes trapped or pinched between the blade and the fence, resulting in a dangerous and unpredictable situation. Here’s what you can do to prevent kickback and address other safety concerns:
- Ensure that the workpiece is securely held in place while using the jointer jig. Use clamps or a suitable holding device to minimize the risk of movement during the cutting process.
- Use a push stick or push block to guide the workpiece through the blade, keeping your hands at a safe distance from the cutting area.
- Keep the table saw blades clean and sharp. Dull or dirty blades can increase the risk of kickback and reduce the overall performance of the jointer jig.
- Wear appropriate safety gear, including safety glasses, hearing protection, and a dust mask, to protect yourself from potential hazards.
Maintaining and Adjusting the Jig for Optimal Performance
Proper maintenance and regular adjustments are crucial for ensuring the optimal performance of your table saw jointer jig. Here are some key steps to keep in mind:
- Regularly clean the jig to remove any sawdust or debris that may affect its functionality. Use a brush or compressed air to clean hard-to-reach areas.
- Inspect the components of the jig for wear and tear. Replace any damaged or worn-out parts to maintain its precision and stability.
- Periodically check and adjust the settings of the jig, such as the height and angle, to ensure that it matches your specific woodworking needs.
- Refer to the manufacturer’s instructions for any guidance on adjusting and maintaining your particular table saw jointer jig model.
By troubleshooting these common issues with table saw jointer jigs and following the recommended solutions, you can enhance the performance of your jig, achieve precise cuts, and enjoy a safer woodworking experience.
Tips And Tricks For Using A Table Saw Jointer Jig
In order to achieve clean and precise cuts with your table saw jointer jig, there are a few important tips and tricks to keep in mind. From choosing the right type of wood for your project to ensuring proper blade alignment and sharpness, these steps are essential for maximizing the efficiency and accuracy of your cuts. Let’s dive into each of these areas in more detail.
Choosing the right type of wood for your project
When using a table saw jointer jig, the type of wood you choose for your project can greatly impact the final result. It’s important to select a wood species that is straight, flat, and free from any knots or defects. This will help ensure that your cuts are even and smooth. Some popular choices include maple, oak, and birch. Remember to also consider the end use of your project and choose a wood that is suitable for the intended purpose.
Ensuring proper blade alignment and sharpness
Blade alignment and sharpness are crucial factors for achieving clean and accurate cuts with a table saw jointer jig. Before starting your project, it’s important to check the alignment of your blade to ensure it is parallel to the fence. This will help prevent any unwanted angles or deviations in your cuts. Additionally, make sure your blade is sharp and in good condition. Dull blades can lead to tear-outs and rough edges, compromising the overall quality of your work.
Maximizing the efficiency and accuracy of your cuts
To maximize the efficiency and accuracy of your cuts, there are a few key strategies to keep in mind when using a table saw jointer jig. First, ensure that the jig is securely fastened to the table saw, providing a stable and reliable platform for your work. Double-check that the fence is properly aligned and adjusted to the desired width of your cut. It’s also helpful to use a push stick or push block to safely guide the wood through the blade, keeping your hands a safe distance away from the sharp edges. Remember to go slowly and steadily, allowing the blade to do the work.
Following these tips and tricks will help you achieve clean, precise, and professional-looking cuts with your table saw jointer jig. By choosing the right type of wood, ensuring proper blade alignment and sharpness, and maximizing the efficiency and accuracy of your cuts, you’ll be well on your way to creating beautiful woodworking projects with ease.
Advanced Techniques With A Table Saw Jointer Jig
When it comes to woodworking, precision and accuracy are key. And if you’re looking to take your woodworking skills to the next level, then an essential tool you need in your arsenal is a table saw jointer jig. This ingenious device allows you to create complex joinery with absolute precision, making it a game-changer in the world of woodworking. In this article, we’ll explore some advanced techniques that can be achieved with a table saw jointer jig, helping you to expand your woodworking capabilities and unlock a whole new realm of possibilities.
Creating complex joinery with precision
With a table saw jointer jig, you have the power to create complex joinery with unmatched accuracy. Whether you’re looking to join two pieces of wood at a perfect 90-degree angle or create intricate joinery for a decorative piece, this jig allows you to achieve tight, seamless connections every time.
One of the key features of a table saw jointer jig is its ability to make smooth and precise cuts, ensuring that your joint fits together flawlessly. By utilizing carefully calibrated adjustments, you can customize the depth of the cut to match exactly the thickness of the wood, resulting in perfectly flush joints. This level of precision is difficult to achieve with other tools, making the table saw jointer jig an indispensable addition to your workshop.
Mitre cuts and bevel cuts with the table saw jointer jig
The versatility of the table saw jointer jig extends beyond simple joinery. With this tool, you can also make mitre cuts and bevel cuts with ease. The jig allows you to tilt the saw blade to the desired angle, enabling you to create mitre cuts for picture frames, boxes, or any project that requires precise angled cuts.
Additionally, the table saw jointer jig makes bevel cuts a breeze. By adjusting the saw blade’s angle and utilizing the jig’s stability and accuracy, you can create bevel cuts for projects like furniture construction, decorative moulding, and more. Whether you’re a seasoned woodworker or just starting out, the table saw jointer jig opens up a whole new world of possibilities for creating visually stunning and intricate designs.
Expanding your woodworking capabilities with the jig
The table saw jointer jig not only enhances the precision of your woodworking, but it also expands your capabilities as a woodworker. With this tool, you can tackle complex, advanced projects that were once out of reach. From crafting dovetail joints and box joints to creating unique designs with multiple angles, the table saw jointer jig empowers you to push the boundaries of your creativity.
Additionally, this jig saves you time and effort by streamlining the process of creating precise cuts and joinery. Instead of relying on multiple tools or tedious hand techniques, you can rely on the accuracy of the table saw jointer jig to achieve professional results quickly and efficiently.
In conclusion, the table saw jointer jig is a must-have tool for any serious woodworker. Its ability to create complex joinery with precision, make mitre and bevel cuts, and expand your woodworking capabilities makes it an invaluable asset in the workshop. Unlock the full potential of your woodworking projects with the table saw jointer jig, and take your craftsmanship to new heights.
Safety Considerations When Using A Table Saw Jointer Jig
When working with a table saw jointer jig, prioritizing safety is paramount. Table saws can be powerful tools that require proper precautions to minimize the risk of accidents or injuries. This section will outline the key safety considerations to keep in mind while using a table saw jointer jig.
Personal Protective Equipment (PPE) for Working with a Table Saw
Wearing the appropriate personal protective equipment (PPE) when operating a table saw jointer jig is crucial for safeguarding yourself from potential hazards. Here are some essential PPE items to have:
- Safety glasses or goggles to shield your eyes from flying debris or wood chips.
- Hearing protection, such as earmuffs or earplugs, to minimize the noise levels generated by the machinery.
- A dust mask or respirator to protect your respiratory system from fine sawdust particles.
- Sturdy work gloves that provide a good grip and protect your hands from sharp edges or accidental contact with the saw blade.
- Non-slip footwear to ensure stability and prevent any potential slips or falls.
Maintaining a Clean and Organized Workspace
A clean and organized workspace is not only conducive to efficient work but also plays a vital role in reducing accidents. Here are a few tips to maintain a safe working environment:
- Regularly clean the sawdust and debris off the table and the surrounding area to prevent any potential interference or instability.
- Store any loose items, such as cords or tools, in designated storage areas to avoid tripping hazards.
- Keep the work area well-lit, ensuring clear visibility of the table saw jointer jig and any potential obstacles.
- Regularly check and maintain the table saw jointer jig to ensure it is in proper working condition.
Safe Handling and Storage of the Table Saw Jointer Jig
Proper handling and storage of the table saw jointer jig are vital to prevent accidents and extend its longevity. Consider the following recommendations:
- Always follow the manufacturer’s instructions when assembling or disassembling the table saw jointer jig.
- Handle the jig with care, avoiding any rough or sudden movements that may cause damage to the tool or yourself.
- Store the jig in a secure and dry location, away from any potential sources of moisture or excessive heat.
- When not in use, cover the table saw jointer jig to protect it from dust and other environmental elements.
By adhering to these safety considerations, you can ensure a safer working experience when using a table saw jointer jig. Remember to always prioritize your safety and the well-being of those around you.
Frequently Asked Questions About Table Saw Jointer Jigs
If you’re a woodworking enthusiast or a DIYer, you’ve probably heard of table saw jointer jigs. These versatile tools are designed to help you achieve precise and smooth cuts by turning your table saw into a jointer. In this section, we’ll address some common questions about these jigs and how they can enhance your woodworking projects.
How does a table saw jointer jig differ from other woodworking tools?
A table saw jointer jig offers a unique advantage when it comes to woodworking tools. While a traditional jointer is a dedicated machine used solely for creating flat and smooth surfaces on boards, a table saw jointer jig transforms your table saw into a versatile jointer, allowing you to accomplish both straight and angled cuts.
With a table saw jointer jig, you no longer need to invest in a separate jointer, saving you valuable workshop space and money. This tool offers the convenience of using your existing table saw to perform jointing tasks, opening up possibilities for creating precise edges, flattening boards, and improving overall workmanship.
Can I build my own table saw jointer jig?
Yes, building your own table saw jointer jig is a possibility for those with moderate woodworking skills. By utilizing readily available materials and following detailed plans or tutorials, you can custom-build a jig that suits your specific needs and preferences.
When designing and constructing your own jig, be sure to consider factors such as stability, accuracy, and safety. It’s crucial to ensure that the jig is securely attached to the table saw and able to provide a stable and smooth surface for your workpiece. Additionally, be mindful of aligning the jig accurately to achieve precise cuts.
Are there any limitations to using a table saw jointer jig?
While table saw jointer jigs offer a host of benefits, it’s important to be aware of their limitations to make the most out of this tool. One such limitation is the maximum width capacity that a table saw jointer jig can accommodate. Depending on the size of your table saw and jig design, you may have restrictions on the width of the workpiece you can effectively joint using this method.
Furthermore, when using a table saw jointer jig, it’s crucial to exercise caution and prioritize safety. Always wear appropriate protective gear, follow proper techniques, and avoid rushing through cuts. Remember to thoroughly familiarize yourself with the jig’s instructions and operations to ensure optimal results and minimize the risk of accidents.
Credit: storables.com
Frequently Asked Questions Of Table Saw Jointer Jig
Can I Use A Table Saw As A Jointer?
A table saw cannot be used as a jointer.
How Do You Make A Jointer Sled For A Table Saw?
To make a jointer sled for a table saw, follow these simple steps to ensure accurate cuts.
What Does A Jointer Jig Do?
A jointer jig is a tool used to straighten and flatten rough or uneven wood surfaces.
How Do You Make A Jig For A Table Saw?
To make a jig for a table saw, follow these steps: measure and mark the desired shape, cut the jig from a sturdy material, attach the jig to your table saw, and test it for accuracy and stability.
Conclusion
To sum up, the table saw jointer jig is an essential tool for any woodworker. Its ability to transform a table saw into a functioning jointer is invaluable when it comes to creating smooth, straight edges on wooden boards. With precise adjustments and a sturdy design, the jig ensures accurate and consistent results, saving both time and effort.
Whether you are a professional carpenter or a hobbyist, having this tool in your workshop will enhance the quality of your woodworking projects. Not only does it provide a cost-effective alternative to purchasing a separate jointer machine, but it also allows you to maximize the functionality of your existing equipment.
Invest in a table saw jointer jig and experience the convenience and efficiency it offers in achieving clean and professional-looking edges on your woodworking projects.

- WoodRiver Plane reviews | Best Wood Hand Planer In 2024 - 19/10/2024
- The Best Tung Oil: The Ultimate Guide in 2024 - 19/10/2024
- 12 Inch Wood Planer: Smooth Your Woodworking Projects Like a Pro - 01/10/2023